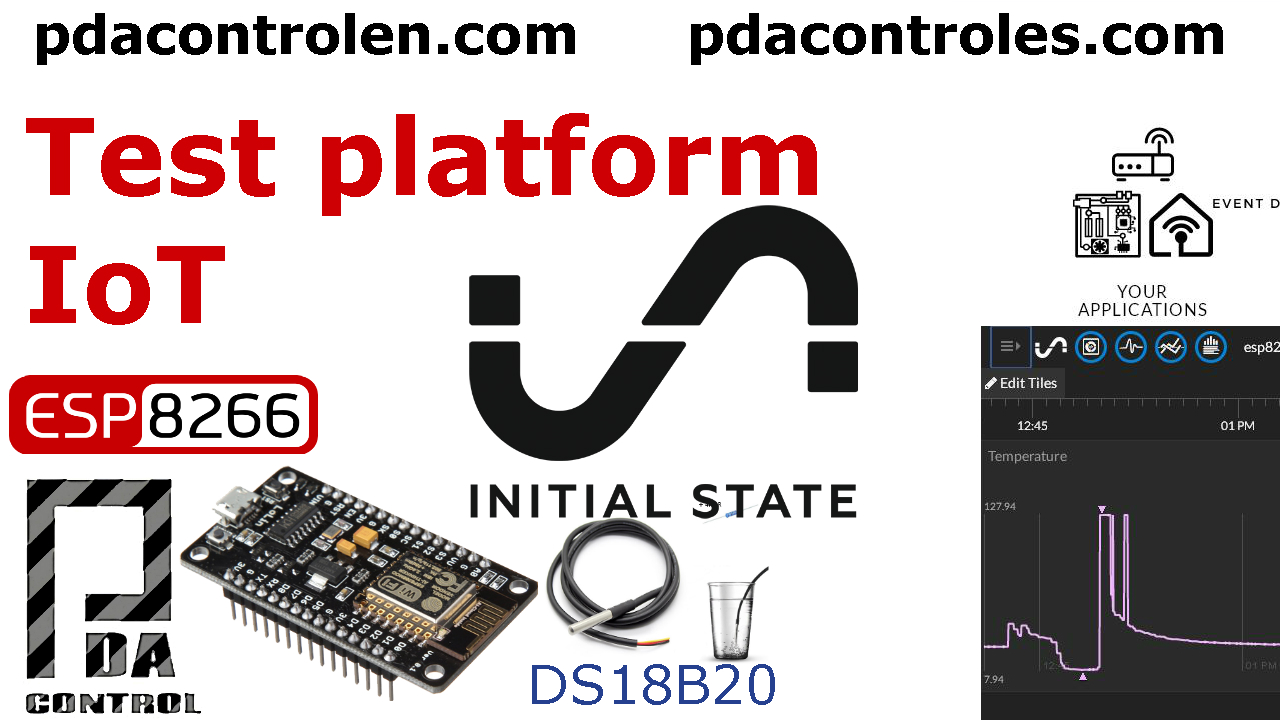
This time we tested the Initialstate platform, is an IoT platform dedicated to the collection and visualization of data, creating colorful graphics.
For our test we will use the ESP8266 Module and a DS18B20 Onewire sensor to collect temperature and then visualize it.
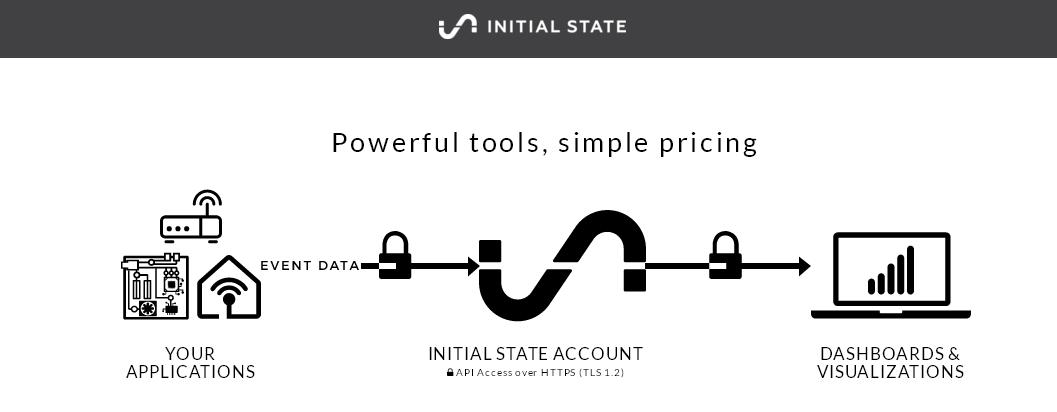
Safely send time series data to your account from sensors, devices, software or anything else that can make an HTTP and HTTPS request.
Oficial Website : Initialstate
A continuation we have made 2 Tutorials in case you want to test in this platform IoT.
Test 1: Create platform account IoT Initialstate
The creation of the test account in Initialstate is free, but you must keep in mind that there are limits and restrictions of which we will speak below.
Test 2: ESP8266 Connection and DS18B20 Sensor to Initialstate Platform
Using Arduino IDE programming and configuration of the module ESP8266 12E NodeMCU, We have taken a test example and made modifications to work with the temperature sensor DS18B20 using the protocol “Onewire“.
The following Initialstate parameters are required for Stream bucket connection:
- bucket Key
- bucketName
- accessKey
Materials and Where to Buy
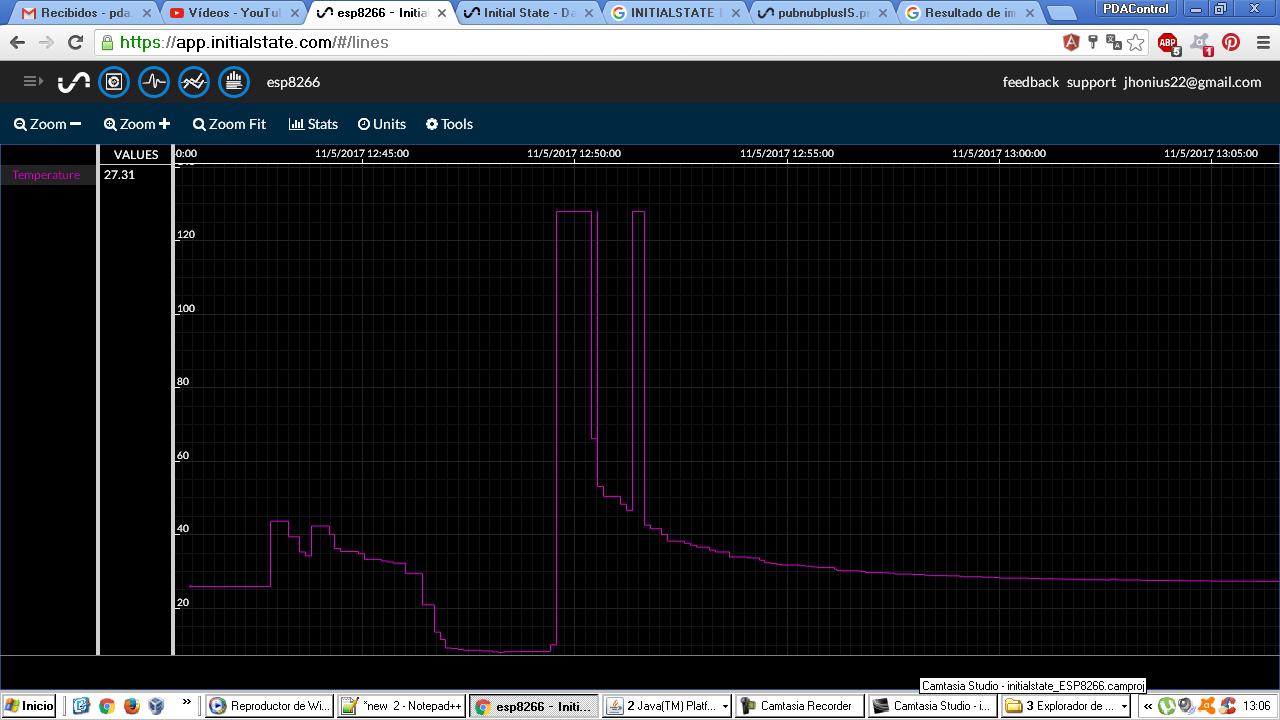
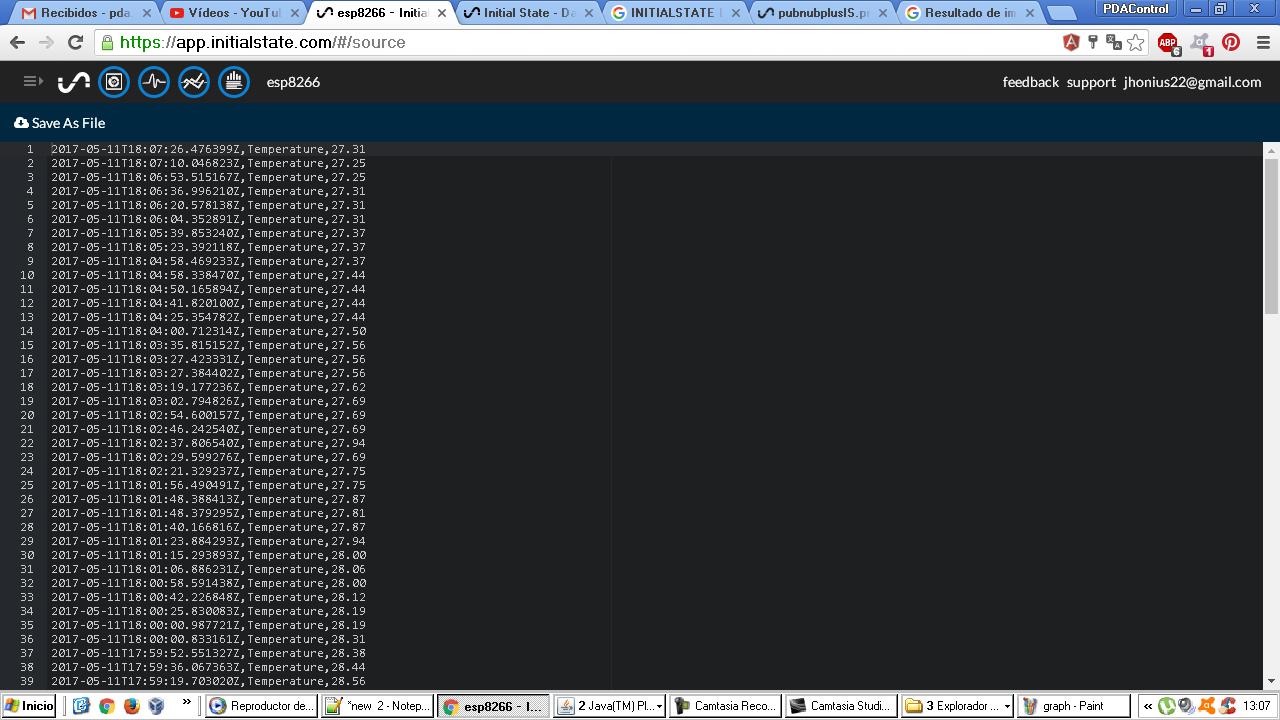
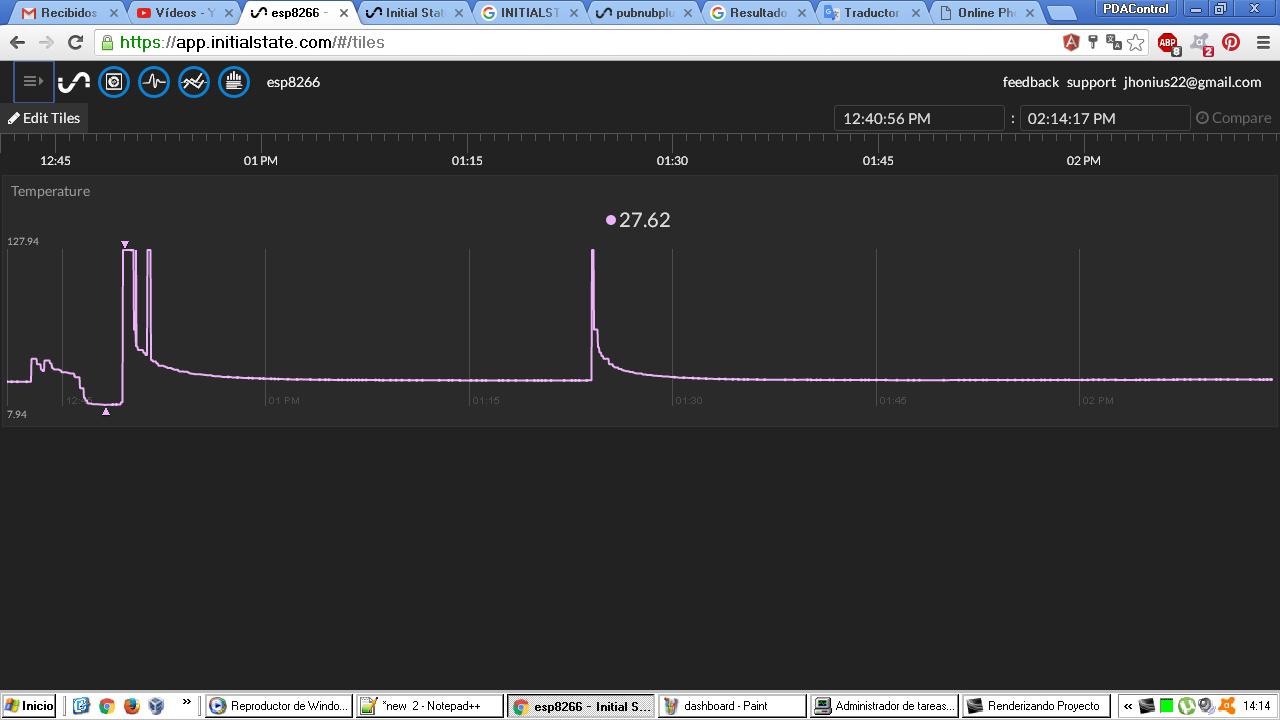
Some Visualizations and Graphics
Arduino IDE Code
Code implemented in ESP8266:
You need to install the libraries in advance:
Libraries & Samples Arduino IDE InitialState Arduino Streamers
///https://github.com/initialstate/arduino_streamers
/*
// Will work with Ethernet Shield
// Thanks to Gaetano Carlucci
//
//
// Modified by PDAControl    /for Onewire
// May 2017
// http://pdacontrolen.com
//
*/
#include < OneWire.h >
#include  < DallasTemperature.h >
#include "ESP8266WiFi.h"
const char* ssid       = "*******";
const char* password   = "********";
const char* server = "insecure-groker.initialstate.com";

///char server[] = "insecure-groker.initialstate.com";    // name address for Google (using DNS
// Data wire is plugged into port 2 on the Arduino
#define ONE_WIRE_BUS 2
// Setup a oneWire instance to communicate with any OneWire devices (not just Maxim/Dallas temperature ICs)
OneWire oneWire(ONE_WIRE_BUS);

// Pass our oneWire reference to Dallas Temperature.
DallasTemperature sensors(&oneWire);
WiFiClient client;
////////////////////////////
// Initial State Streamer //
////////////////////////////

// Data destination
// https can't be handled by the ESP8266, thus "insecure"
#define ISDestURL "insecure-groker.initialstate.com"
// Bucket key (hidden reference to your bucket that allows appending):
#define bucketKey "*************"
// Bucket name (name your data will be associated with in Initial State):
#define bucketName "**********"
// Access key (the one you find in your account settings):
#define accessKey "********************"
// How many signals are in your stream? You can have as few or as many as you want
const int NUM_SIGNALS = 2;
// What are the names of your signals (i.e. "Temperature", "Humidity", etc.)
//String signalName[NUM_SIGNALS] = {"Signal 1", "Signal 2"};
// This array is to store our signal data later
String signalData[NUM_SIGNALS];

String ValueName;
String ValueData;

//////////////////////
// Network Settings //
/////////////////////
void setup() {

    sensors.begin();
  // start serial port:
  Serial.begin(115200);
  while (!Serial) {
    ; // wait for serial port to connect. Needed for native USB port only
  }

  // start wifi
  Serial.println();
  Serial.print("Connecting to ");
  Serial.println(ssid);
  WiFi.begin(ssid, password);
  while (WiFi.status() != WL_CONNECTED) {
    delay(500);
    Serial.print(".");
  }

  // The postBucket() function creates a bucket
  // (unnecessary if the bucket already exists)
  while (!postBucket()) {};
}
void loop() {
  // if there's incoming data from the net connection.
  // send it out the serial port.  This is for debugging
  // purposes only:
  if (client.available()) {
    char c = client.read();
    Serial.write(c);
  }
  sensors.requestTemperatures(); // Send the command to get temperatures
  Serial.print("Temperature");
 ValueName= "Temperature";
 ValueData=String(sensors.getTempCByIndex(0));

  // The postData() function streams our events
  while(!postData());
  // Wait for 1 seconds before collecting and sending the next batch
  delay(7000);
}

// this method makes a HTTP connection to the server and creates a bucket is it does not exist:
bool postBucket() {
  // close any connection before send a new request.
  // This will free the socket on the WiFi shield
  client.stop();

  // if there's a successful connection:
  if (client.connect(ISDestURL, 80)) {
    Serial.println("connecting...");
    // send the HTTP PUT request:
    // Build HTTP request.
    String toSend = "POST /api/buckets HTTP/1.1\r\n";
    toSend += "Host:";
    toSend += ISDestURL;
    toSend += "\r\n" ;
    toSend += "User-Agent:Arduino\r\n";
    toSend += "Accept-Version: ~0\r\n";
    toSend += "X-IS-AccessKey: " accessKey "\r\n";
    toSend += "Content-Type: application/json\r\n";
    String payload = "{\"bucketKey\": \"" bucketKey "\",";
    payload += "\"bucketName\": \"" bucketName "\"}";
    payload += "\r\n";
    toSend += "Content-Length: "+String(payload.length())+"\r\n";
    toSend += "\r\n";
    toSend += payload;

    client.println(toSend);
    Serial.println(toSend);
    return true;
  } else {
    // if you couldn't make a connection:
    Serial.println("connection failed");
    return false;
  }
}
// this method makes a HTTP connection to the server and sends the signals measured:
bool postData() {
  // close any connection before send a new request.
  // This will free the socket on the WiFi shield
  client.stop();

  // if there's a successful connection:
  if (client.connect(ISDestURL, 80)) {
    Serial.println("connecting...");
    // send the HTTP PUT request:
    // Build HTTP request.
    // Build HTTP request.

    String toSend = "POST /api/events HTTP/1.1\r\n";
    toSend += "Host:";
    toSend += ISDestURL;
    toSend += "\r\n" ;
    toSend += "Content-Type: application/json\r\n";
    toSend += "User-Agent: Arduino\r\n";
    toSend += "Accept-Version: ~0\r\n";
    toSend += "X-IS-AccessKey:  " accessKey "\r\n";
    toSend += "X-IS-BucketKey:  " bucketKey "\r\n";

    String payload = "[{\"key\": \"" + ValueName + "\", ";
    payload +="\"value\": \"" + ValueData + "\"}]\r\n";

    toSend += "Content-Length: "+String(payload.length())+"\r\n";
    toSend += "\r\n";
    toSend += payload;

    Serial.println(toSend);
    client.println(toSend);

  return true;
  } else {
    // if you couldn't make a connection:
    Serial.println("connection failed");
    return false;
  }
}
Other similar references ..
Conclusions and Considerations
Initialstate is another very good solution created for the Internet of things, allowing to create colorful dashboards and its data sending API is very simple via HTTP technically allows any device to send data without any complication.
Since we are using a free account similar to other platforms that we have tested exist Restrictions regarding use of bandwidth and we only have 1 day data retention to other services this platform, such services in the paid version contain triggers, unlimited retention, Sending MSM, Email, Expressions in real time, sharing dashboards and embedded dashboards and of course support via email.
This testing is performed simply to present another IoT market solution.
Downloads
Libraries & Samples Arduino IDE InitialState Arduino Streamers
Hola Amigos,
Si quisiera enviar al mismo bucket las mediciones de 5 DS18B20? que lineas deberia repetir? ectoy hace varias semanas intentando sin exito.
Gracias!
Diego