The MQTT protocol has taken great strength in recent years since it is simple, safe, practical and lightweight perfect for IoT and M2M applications.
Thanks to the contribution of developers and developers of MQTT applications, there are public MQTT Broker for Internet monitoring and control tests, are available to connect from any MQTT client in this case we will use HIVEMQ, which has dashboard to view MQTT connections and Web sockets, since it is public should have some considerations that we will see below.
Oficial Website: HiveMQ
Dashboard MQTT: HiveMQ
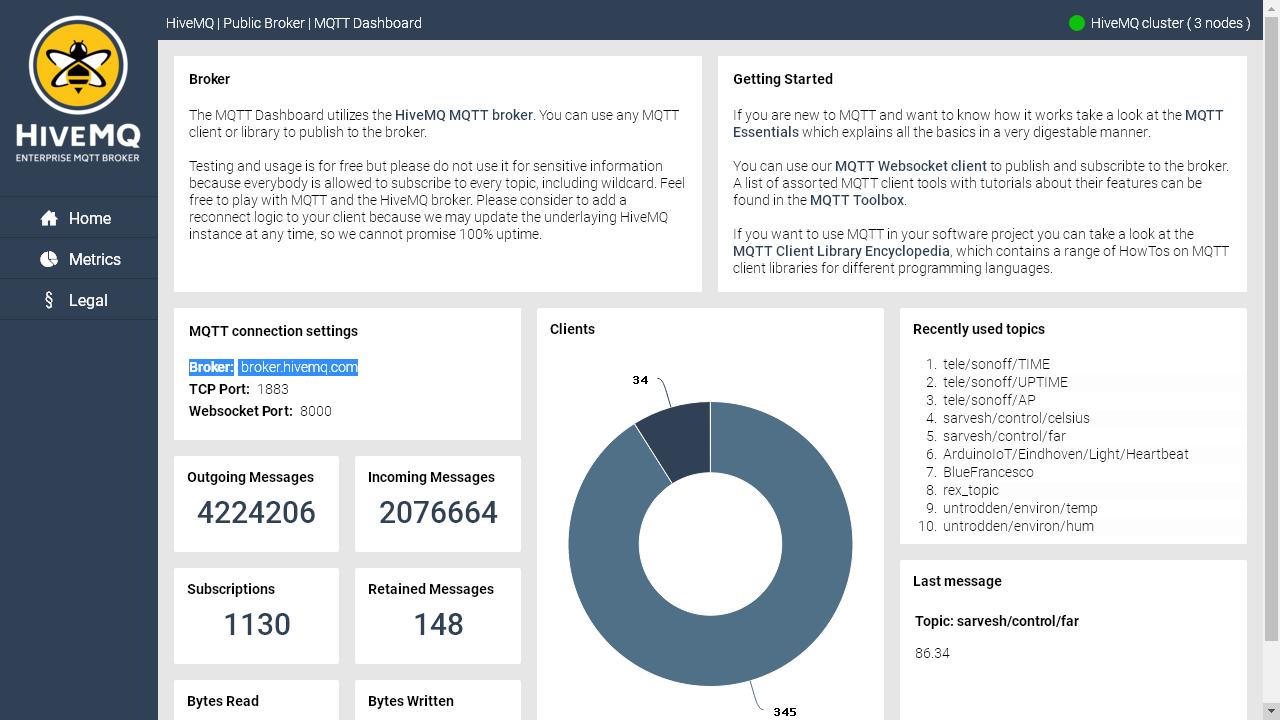
Connections Broker MQTT
Broker: broker.hivemq.com
TCP Port: 1883
Websocket Port: 8000
Other publics Broker’s
- Public Broker Tests HIVEMQ
- Public Broker Tests Mosca.io
- Public mqtt Broker
- Public Broker Test Mosquitto
Test
Then we will do 2 tests:
Connection Broker MQTT HIVEMQ with Node-RED
Node-RED MQTT Parameters
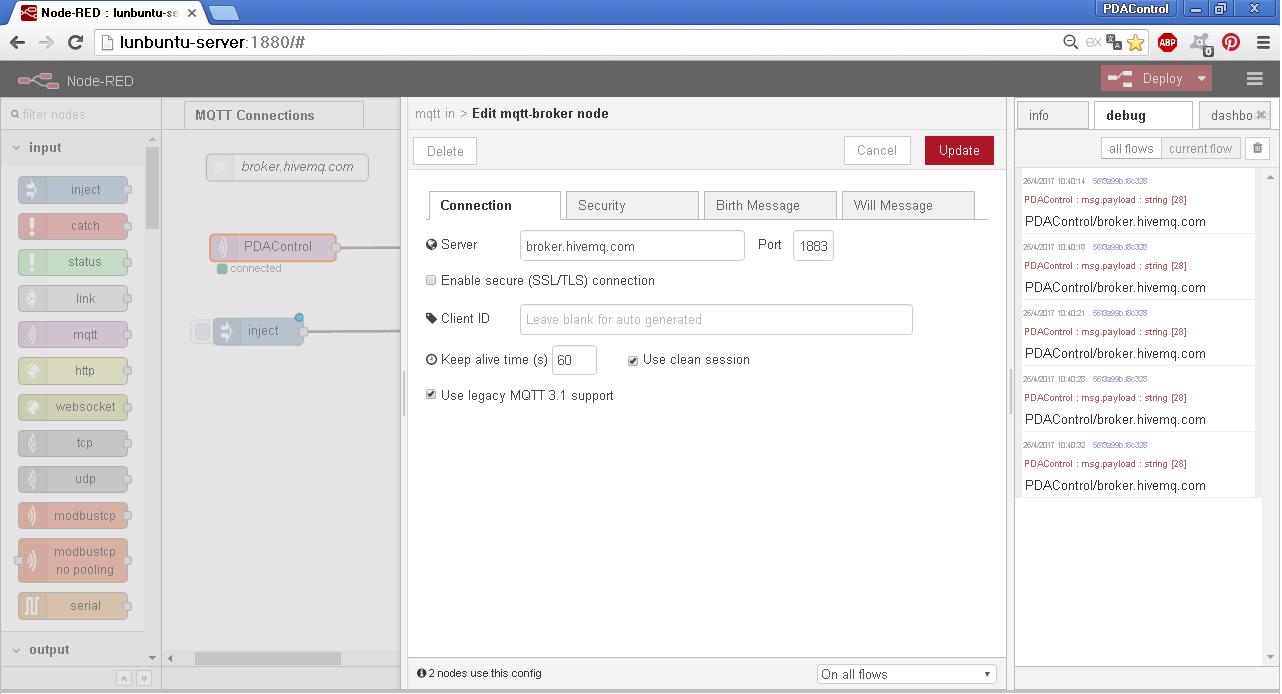
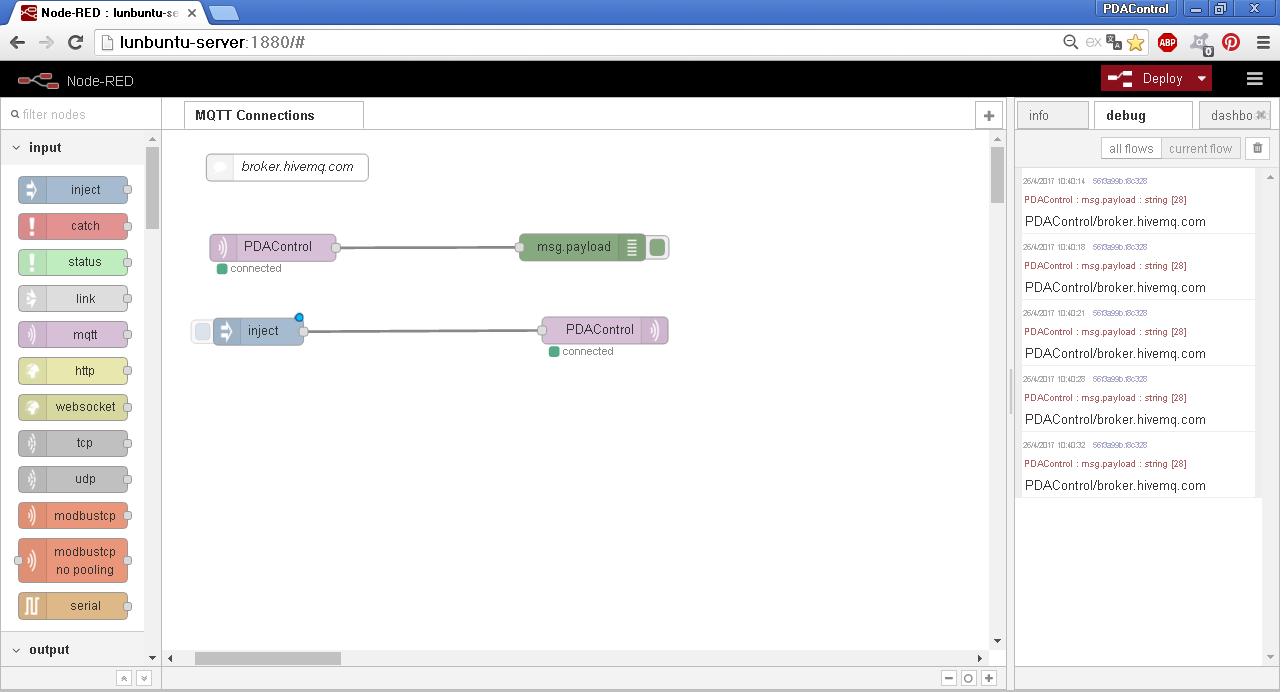
Using Node-RED previously installed on a local server in my network, we will make the MQTT connection with HIVEMQ to validate the connection from any MQTT client.
Connection Broker MQTT HIVEMQ with ESP8266 & Node-RED
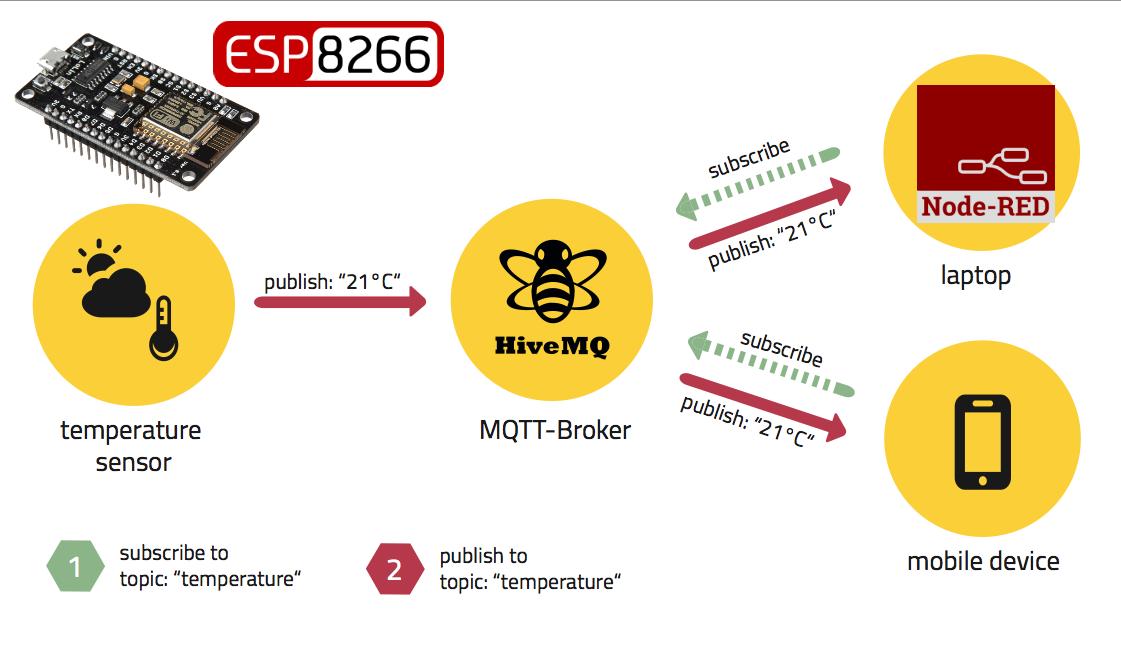
In this case the module ESP8266 12E NodeMCU configured as client MQTT read a temperature sensor DS18B20 Protocol (Onewire) sends the temperature via MQTT to the Broker HIVEMQ and Node-RED installed in the local network requests the value of temperature and graph On Node-RED Dashboard.
MQTT Topic
“temperature/PDAControl/sensor”
Message
Temperature value examples “28.9”
Architecture MQTT
Full Video Explained ESP8266 HiveMQ & Node-RED
Similar Tests
- Tutorial Amplifier Audio PAM8302A ESP8266 Node-RED MQTT
- Tutorial ESP8266 Node-RED Granafa InfluxDB MQTT
- Tutorial ESP8266 DS18B20 Temperature Node-RED MQTT (Mosquitto) IoT
- Tutorial ESP8266 Node-RED Granafa InfluxDB MQTT
- Tutorial ESP8266 and Node-RED MQTT GPIO (Mosquitto) # 1
- Tutorial ESP8266 Control Servo Node-RED MQTT (Mosquitto) IoT #2
- Node-RED Platform
Arduino IDE Code
The ESP8266 module is configured as an MQTT client and performs the periodic temperature reading of the DS18B20 sensor, connected to the D4 pin (Gpio 02), supply to 5v, with its respective recommended resistance in the maxim datasheet.
Requires libraries:
- PubSubClient.h
- OneWire.h
- DallasTemperature.h
/* MQTT Client Temperature Onewire
* More information about projects PDAControl
* PDAControl English http://pdacontrolen.com
* Mas informacion sobre proyectos PDAControl
* PDAControl Espanol http://pdacontrolen.com
* Channel Youtube https://www.youtube.com/c/JhonValenciaPDAcontrol/videos
*/

#include < ESP8266WiFi.h >
#include < PubSubClient.h >
#include < OneWire.h >
#include < DallasTemperature.h >

// Data wire is plugged into port 2 on the Arduino
#define ONE_WIRE_BUS 2 // pin 2

// Setup a oneWire instance to communicate with any OneWire devices (not just Maxim/Dallas temperature ICs)
OneWire oneWire(ONE_WIRE_BUS);

// Pass our oneWire reference to Dallas Temperature.
DallasTemperature sensors(&oneWire);

// Update these with values suitable for your network.

const char* ssid = "************";
const char* password = "************";
const char* mqtt_server = "broker.hivemq.com"; /// MQTT Broker
int mqtt_port = 1883;

WiFiClient espClient;
PubSubClient client(espClient);
long lastMsg = 0;
char msg[50];
int value = 0;

void setup() {
 Serial.begin(115200);
 // Start up the library
 sensors.begin();

 setup_wifi();
 client.setServer(mqtt_server, mqtt_port);
 client.setCallback(callback);

 Serial.println("Connected ");
 Serial.print("MQTT Server ");
 Serial.print(mqtt_server);
 Serial.print(":");
 Serial.println(String(mqtt_port));
 Serial.print("ESP8266 IP ");
 Serial.println(WiFi.localIP());
 Serial.println("Modbus RTU Master Online");


}

void setup_wifi() {

 delay(10);
 // We start by connecting to a WiFi network
 Serial.println();
 Serial.print("Connecting to ");
 Serial.println(ssid);

 WiFi.begin(ssid, password);

 while (WiFi.status() != WL_CONNECTED) {
 delay(500);
 Serial.print(".");
 }

 Serial.println("");
 Serial.println("WiFi connected");
 Serial.println("IP address: ");
 Serial.println(WiFi.localIP());
}

void callback(char* topic, byte* payload, unsigned int length) {
 Serial.print("Message arrived [");
 Serial.print(topic);
 Serial.print("] ");
 for (int i = 0; i < length; i++) {
 Serial.print((char)payload[i]);
 }
 Serial.println();

}

void reconnect() {
 // Loop until we're reconnected
 while (!client.connected()) {
 Serial.print("Attempting MQTT connection...");
 // Attempt to connect
 if (client.connect("ESP8266Client")) {

 Serial.println("connected");
 // client.subscribe("event");
 } else {
 Serial.print("failed, rc=");
 Serial.print(client.state());
 Serial.println(" try again in 5 seconds");
 // Wait 5 seconds before retrying
 delay(5000);
 }
 }
}
void loop() {

 sensors.requestTemperatures();
 float celsius = sensors.getTempCByIndex(0);
 Serial.println(sensors.getTempCByIndex(0));

 char temperaturenow [15];
 dtostrf(celsius,7, 3, temperaturenow); //// convert float to char
 client.publish("temperature/PDAControl/sensor", temperaturenow); /// send char

 if (!client.connected()) {
 reconnect();

 }
 client.loop();

 delay(10000);

}
Materials and where to buy
Conclusions and recommendations
We consider that although technically the broker is public we do not realize applications that are constantly connected to this broker, and since it is free public HIVE has several legal aspects that must be taken into account.
We only perform fast tests, although it should be noted that they have mounted their IoT applications with this broker without any apparent inconvenience the service is active and public.
With a broker in the cloud (intenet) from anywhere we could connect our devices and applications without limits of IP addresses and other restrictions, currently research plans and services of MQTT servers.
In next tutorials we will try other public MQTT servers and interactions with FRED (Node-RED).
Other publics Broker’s
- Public Broker Tests HIVEMQ
- Public Broker Tests Mosca.io
- Public mqtt Broker
- Public Broker Test Mosquitto
References
- Public mqtt Broker
- Tutorial Amplifier Audio PAM8302A ESP8266 Node-RED MQTT
- Tutorial ESP8266 Node-RED Granafa InfluxDB MQTT
- Tutorial ESP8266 DS18B20 Temperature Node-RED MQTT (Mosquitto) IoT
- Tutorial ESP8266 Node-RED Granafa InfluxDB MQTT
- Tutorial ESP8266 and Node-RED MQTT GPIO (Mosquitto) # 1
- Tutorial ESP8266 Control Servo Node-RED MQTT (Mosquitto) IoT #2
- Node-RED Platform
