
To integrate the module ESP8266 with node-red IoT platform has been used MQTT protocol, there are client libraries for esp8266 as MQTT in this case I decided to use the library pubsubclient.
This example will receive Node Red that receives data from the ESP8266 and allow control a LED connected to GPIO 02 from a dashboard created in Node Red Dashboard .

Test Led ESP8266 MQTT Mosquitto Node Red IoT # 1
Install Node-RED
Arduino IDE add the pubsubclient library using the search engine libraries or manually by downloading the library and storing it in their respective folder for libraries.
Note: To successfully complete this tutorial you must perform the following tutorials.
Previous tutorials Recommended
icstation.com
Tutorial 1 : Install Lubuntu (Ubuntu)
Tutorial 2 : Installation node red platform
Tutorial 3: Installation Node Red Dashboard
Tutorial 4: Installation Modbus TCP IP in Node Red
Tutorial 5: Installation of Mosquitto Broker MQTT in Lubuntu
Tutorial 6: Program ESP8266 con Arduino IDE
Arduino IDE code
Arduino IDE code performs several steps but definire major, Broker connection with MQTT, function post (send messages) even specific topic and subscribe function (receive messages) even specific topic.
Note: At the bottom of the post code Full IDE arduino
1 .Parameters Network
Set parameters network PASSWORD and SSID is required to have previously installed a MQTT Broker server which performs the function server broker, in this case I use Mosquitto MQTT.
const char* ssid = "##############";
const char* password = "###############";
const char* mqtt_server = "192.168.0.19";
2. Function publish (“topic” message)
client.publish("event", "hello world");
3. subscribe Function (“topic”)
the subscribe function makes a call to the callback function for data reception
client.subscribe("event");
4. callback function
This function enter 3 personal parameters of the library pubsubclient.h topic, payload (load) and size, performs printing of the topic and the message, to turn on the LED diode sweeps payload in a specific position to determine the state 1 or 0.
void callback(char* topic, byte* payload, unsigned int length) {
  Serial.print("Message arrived [");
  Serial.print(topic);
  Serial.print("] ");
  for (int i = 0; i < length; i++) {
    Serial.print((char)payload[i]);
  }
  Serial.println();

  // Switch on the LED if an 1 was received as first character
  if ((char)payload[0] == '0') {
     Serial.println("LOW");
    digitalWrite(2, LOW);   // Turn the LED on (Note that LOW is the voltage level
    // but actually the LED is on; this is because
    // it is acive low on the ESP-01)
  }

 if ((char)payload[0] == '1') {
    Serial.println("HIGH");
    digitalWrite(2, HIGH);  // Turn the LED off by making the voltage HIGH
  }

}
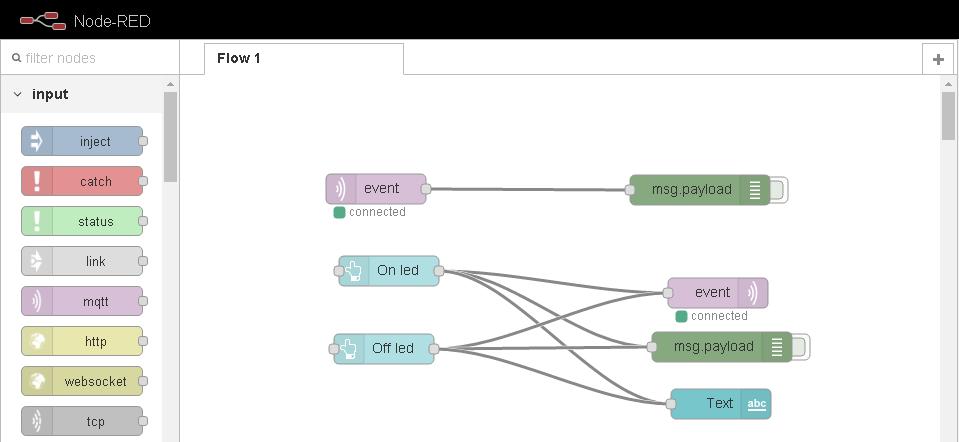
Node-RED
1 Node client receiving messages MQTT (subscribe) from ESP8266 through the topic “event” node debugging and debug.
2 Building 2 button “On” “Off” for sending node values MQTT (publish) to ESP8266 topic “event”
3 Node text text output to display status LED diode.
Note: At the bottom of the post code on Github Import Nodes
Design Node Red Dashboard

Visualization Node red Dashboard

Configure Led ESP8266 MQTT Mosquitto Node Red IoT # 2
Conections ESP8266

VIDEO : Programming ESP8266 with Arduino IDE
Where to buy? Very cheap!!
Downloads:
References
icstation.com
Tutorial 1 : Install Lubuntu (Ubuntu)
Tutorial 2 : Installation node red platform
Tutorial 3: Installation Node Red Dashboard
Tutorial 4: Installation Modbus TCP IP in Node Red
Tutorial 5: Installation of Mosquitto Broker MQTT in Lubuntu
Tutorial 6: Program ESP8266 con Arduino IDE
arduino controlled digital camera via modbus
node-red-dashboard
Nodered.org
github.com/node-red
Nodejs.org
Youtube Channel:
PDAControl