The main disadvantage is to configure the network credentials in a esp8266 without requiring to modify and download the firmware again, I have tested with several methods to dynamically store the SSID and PASSWORD of a network.
In the case of the esp8266 programmed in Arduino IDE for some time I have seen a proposal called WIfiManager presented by Tzapu, which allows an agile and fast connection, the first tests are registered since 2015.
WifiManager
This time we will make a brief introduction to the WifiManager library, I have tested 2 similar versions.
Version 1: WifiManager created by tzapu – creator
Version 2: WifiManager by Ken Taylor modified and based on WifiManager created by tzapu.
Note: they work perfectly, obviously between the 2 libraries there are variations in code implementations and that generates incompatibilities or errors in some functions between version 1 and 2.
Features
I will mention some of the functionalities of the WifiManager libraries, in case of using them the complete and detailed information of each library is available in github, in this case I have used the Version 2: WifiManager library by Ken Taylor.
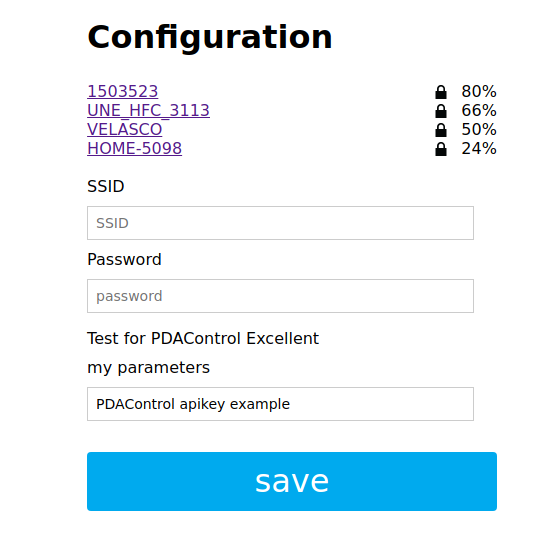
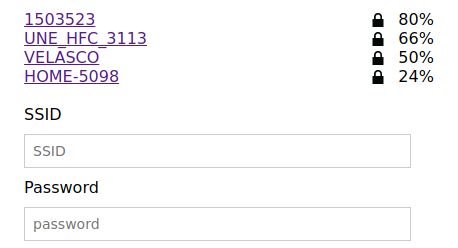
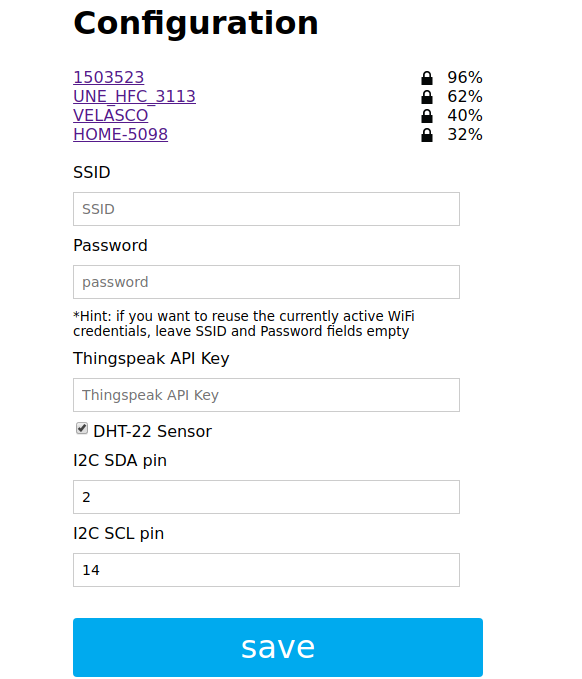
-Main Functionality Configuration of NETWORK credentials.
-Timeout of AP mode “180 s”, if it is not configured wifi the module restarts automatically after the defined time in seconds example: 180 .
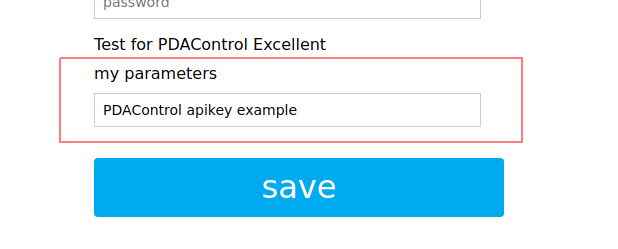
– Custom html text function, allows you to add titles in HTML form.
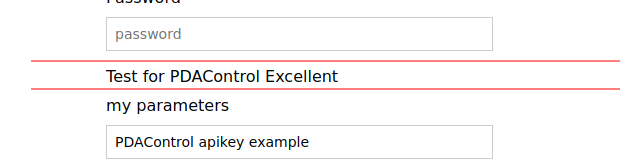
-Form form to enter string “parameters”, create input fields of parameters, to capture parameters and store data requires handling functions SPIFFS and Json.
– Boolean checkbox function to select, enable or disable parameters, to capture parameters and store data requires handling SPIFFS and Json functions.

-Function add css styles in html, modify HTML form styles via ccs, in this case invert colors.
Materials
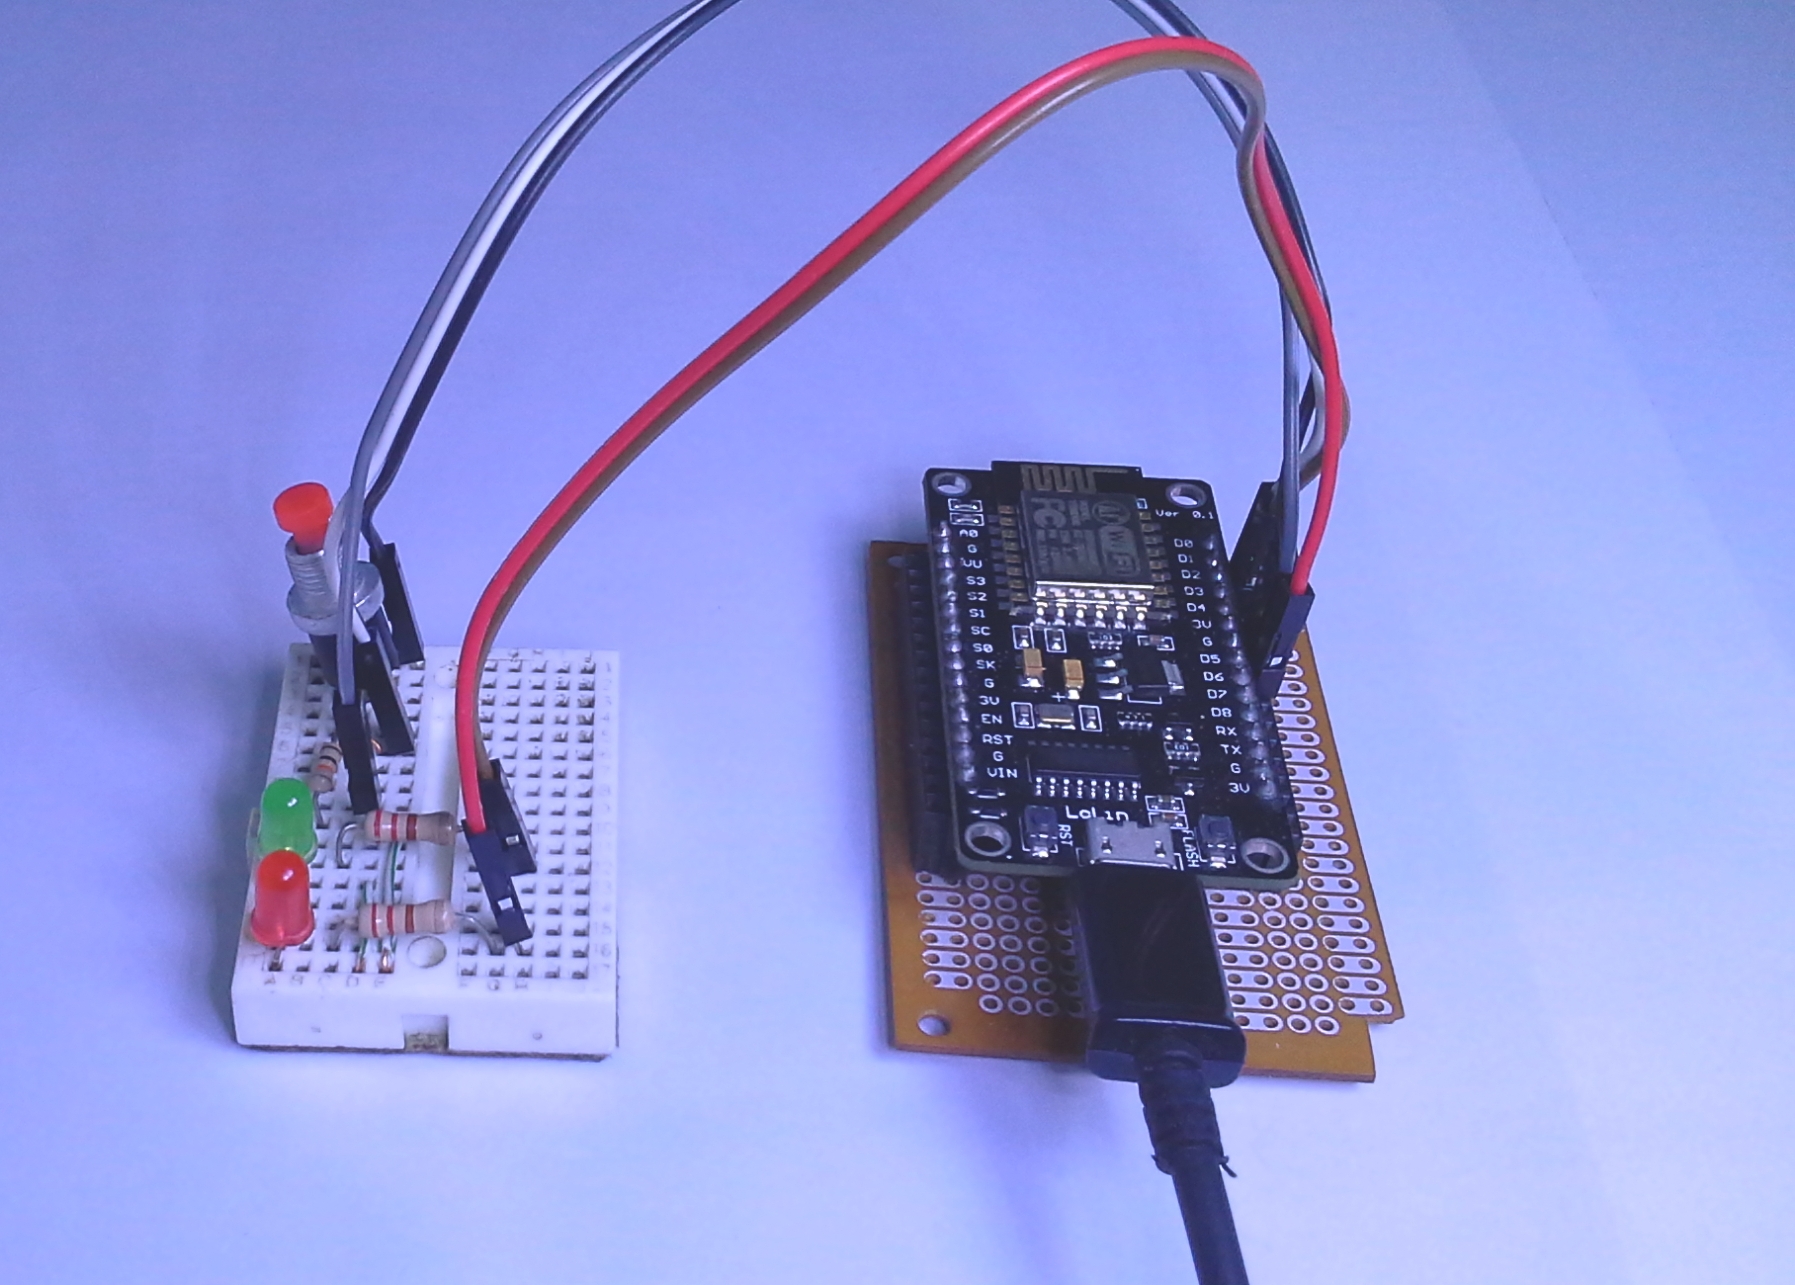
1 Module ESP8266 12E Node MCU or ESP8266 12F
1 Pushbutton”normally open” NO
2 Resistors 220 Ohm
1 Resistors 10K
2 Diode led, “red y green.”
Wires
Tests
An example has been downloaded from Github and has been cut to make a light and simple version, without the slightly complex functionalities that we will see later, this version will realize the basic configuration of NETWORK credentials.
Mounting
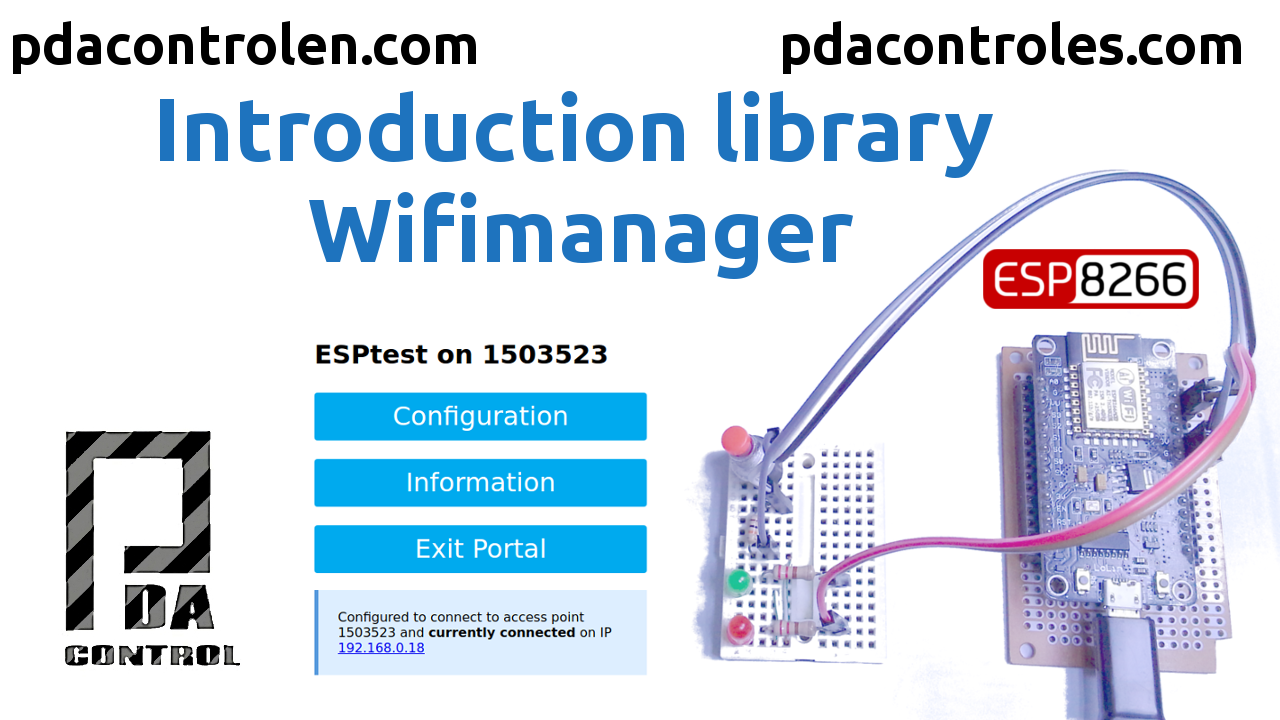
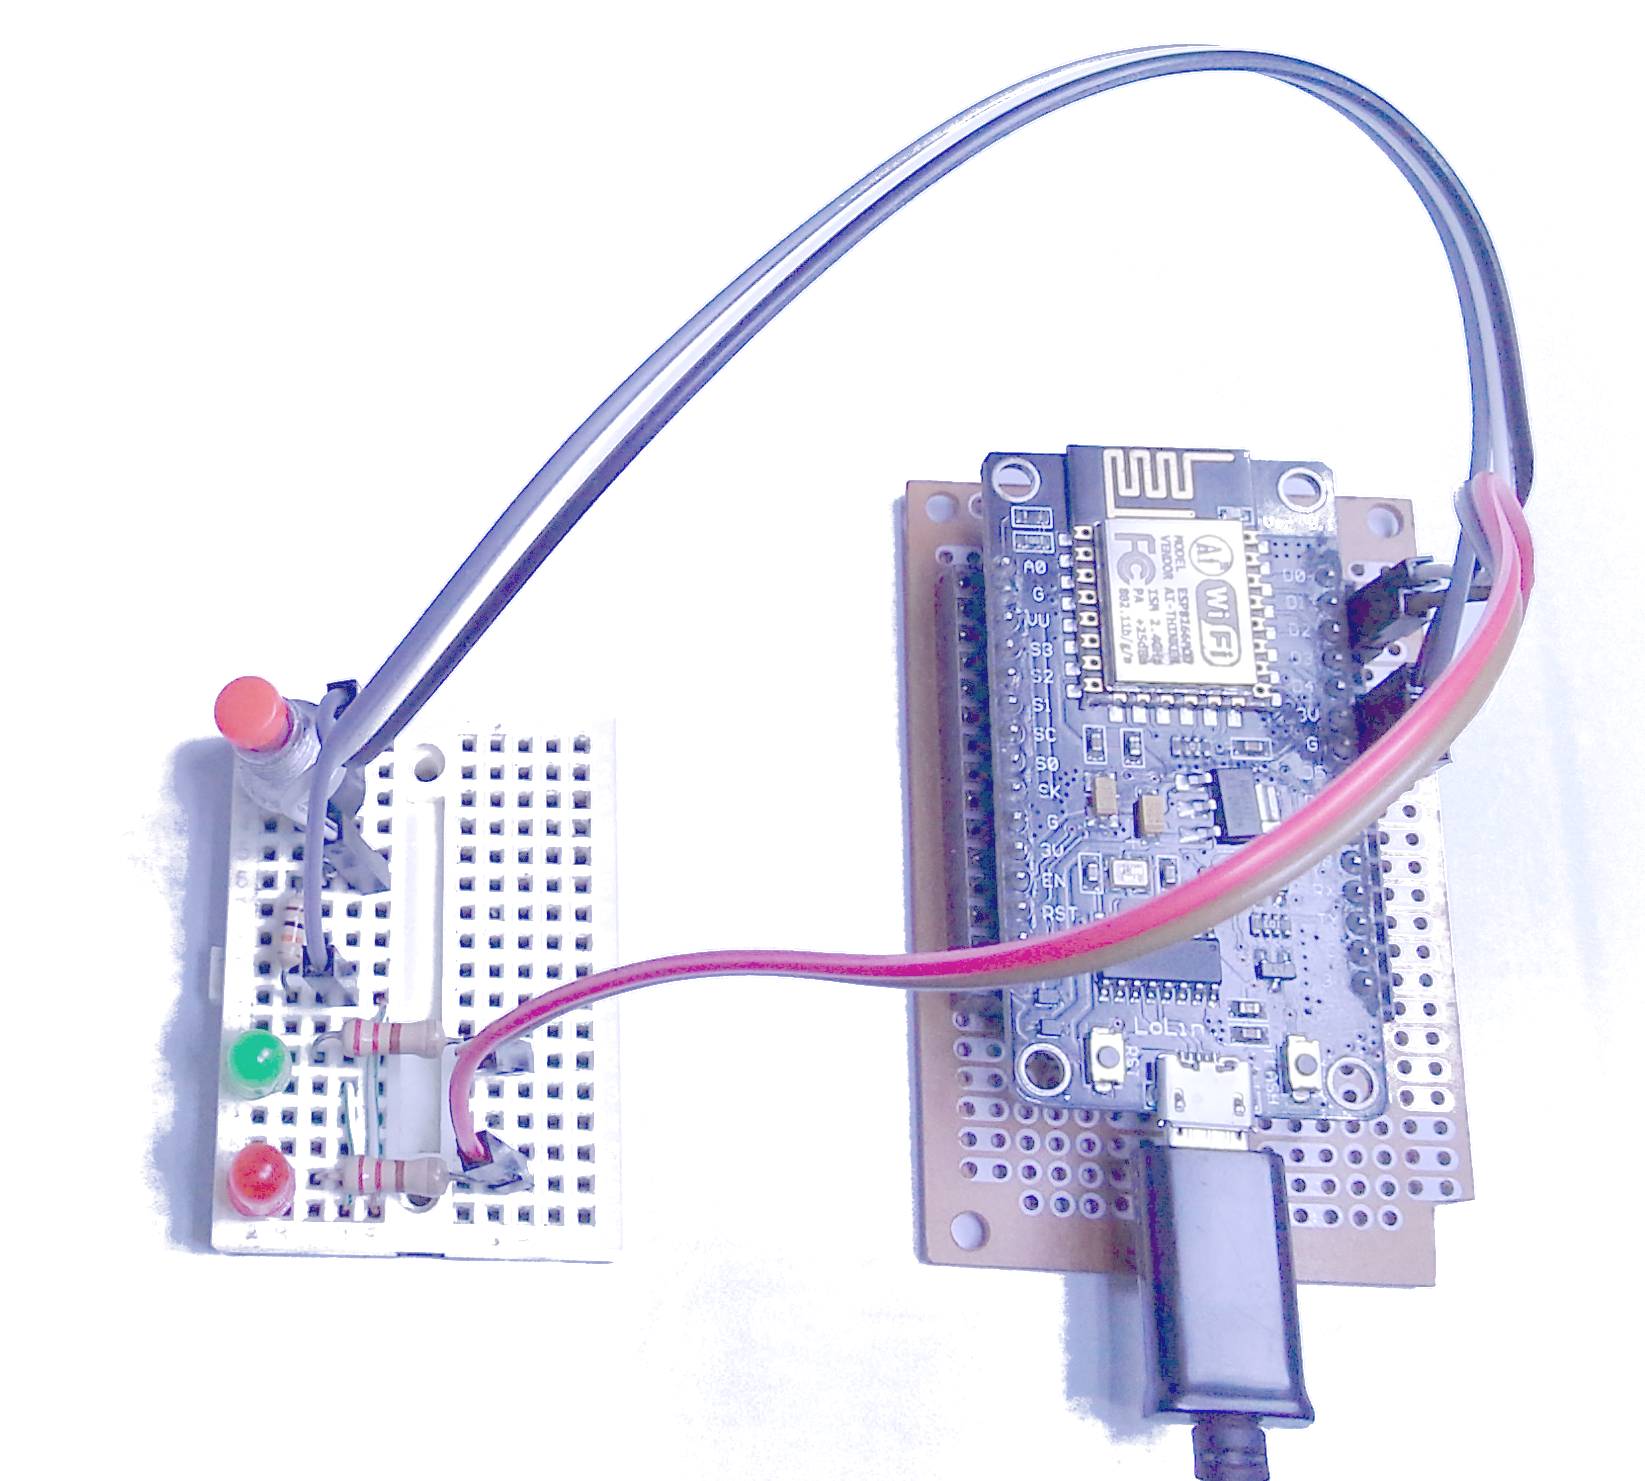
We have used an ESP8266 12E, we have added a button to configure the Wifi and 2 led diodes as indicators.
Connections
- GPIO 5 (Pin D1) – Wifi Config button + 10K resistor
- GPIO 14 (Pin D5) – led red + Resistance 220 Ohm
- GPIO 4 (Pin D2) – led green + Resistance 220 Ohm
- The technically pressed stops the void loop execution, resets network parameters and enables AP mode, this functionality depends on the code or loop executed.
- RED LED: indicates wifi configuration status,
-led = “On” wifi configuration mode, in process.
-led = “Off” network configuration Successful. - LED GREEN: in this test we will not use it, but its function is to indicate the connection status in client mode, eg: esp8266 sending data to a platform, emoncms, blink, thinger.io, thinkspeak, Node-RED etc.
-led = “On” sending and receiving data Ok.
-led = “Off” sending and / or connection with failed server.
Note: if the button is removed, the esp8266 will always be in AP mode “Wifi configuration”
Description of Sequence
Basic explanation:
- Press “config wifi” button.
- esp8266 resets Network parameters and initiates AP mode “Access Point”.
- Create a new Wifi network from the esp8266.
- Connect to the ESPXXXX network.
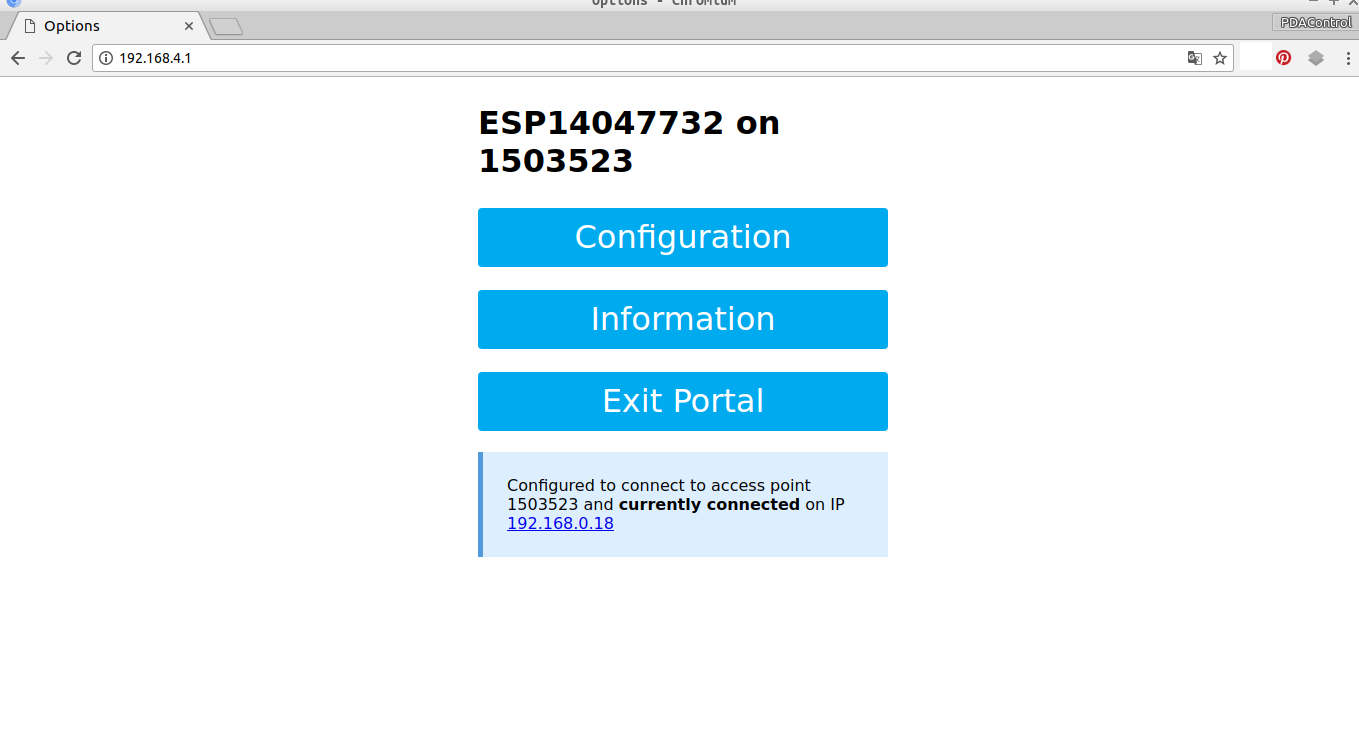
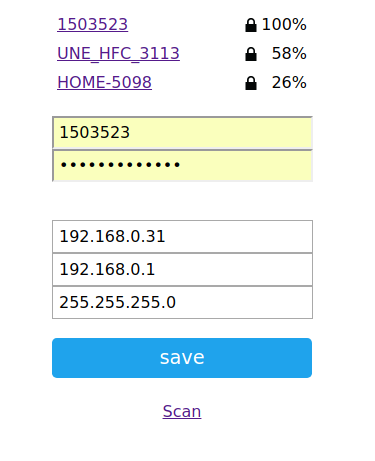
- From the browser, enter 192.168.4.1.
- From form make SSID and PASS configuration.
- Reset esp8266, disappears red ESPXXXX.
- esp8266 STA mode will connect and execute void loop code normally.
Introduction library WifiManager explained – explicado
This video has been made to test some of the features mentioned above.
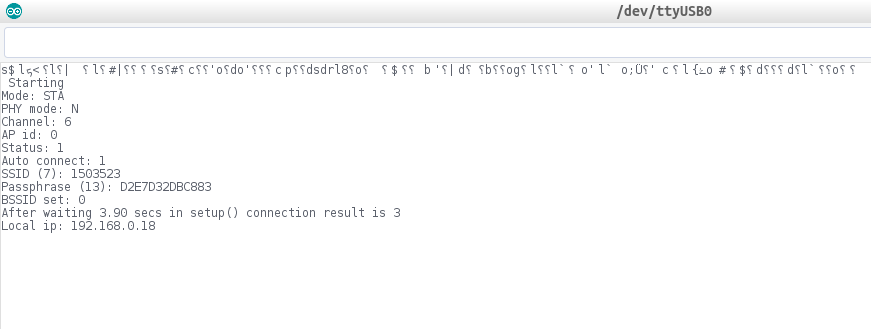
Serial Debugging
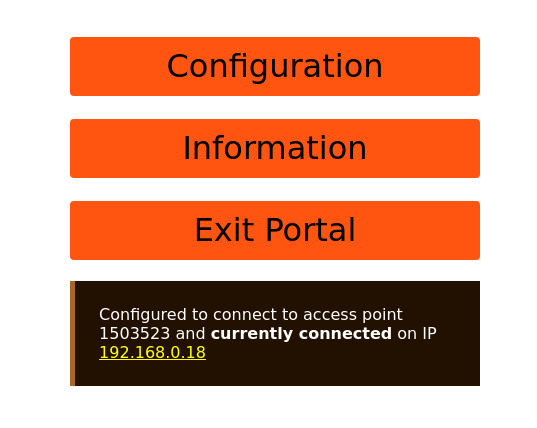
ESP8266 in Access Point mode “ESPTest” for configuration of Network parameters.
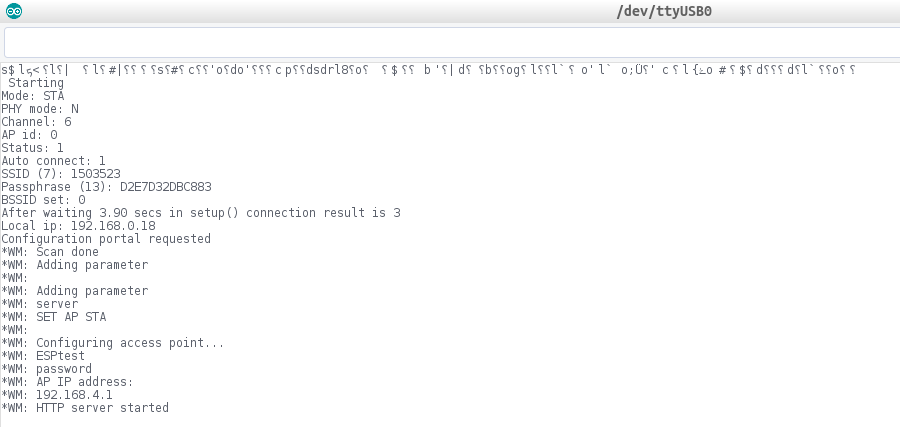
ESP8266 in station mode connected to RED “1503523” executing “void loop”.
Arduino IDE Code
Note: In this case the code is a trimmed version, allowing the basic configuration and connection, download link at the end of the post and require the following libraries:
- FS.h
- ESP8266WiFi.h
- ArduinoJson.h
- ESP8266WebServer.h
- DNSServer.h
Other functionalities
Fixed Network Parameters – Version 1 libraries
In the case of the previous tests we made a configuration and Wifi connection via DCHP assigned by our router, but there is a method of assigning complete parameters from form:
- Fixed IP address
- Subnet Mask
- Gateway.
Storage of HTML parameters and functionalities – Wifimanager Version 2 libraries
- Entering additional parameters
- Enable checkbox
Parameter reading via JSON from browser in configuration mode – Version 2.
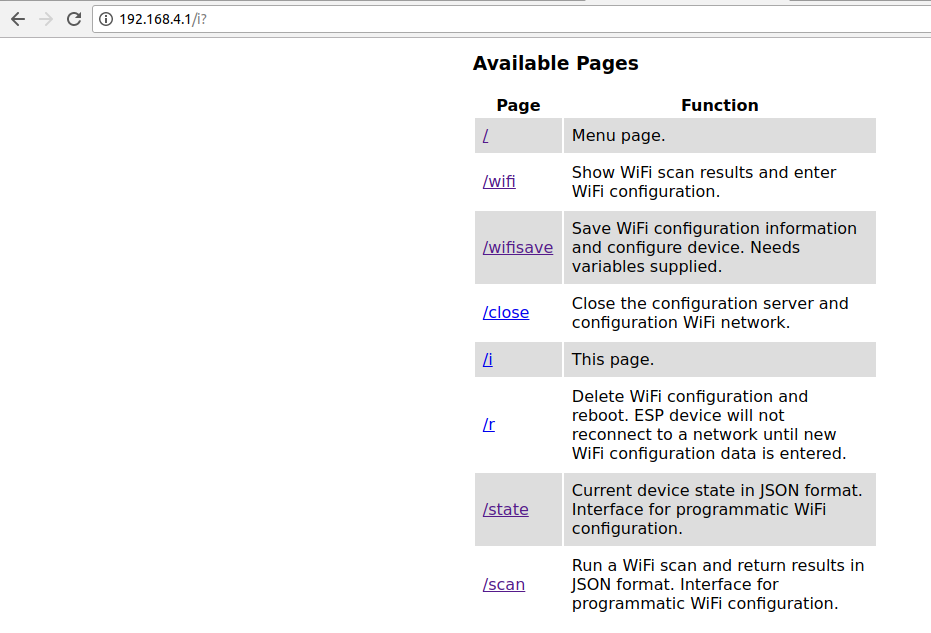
- scan reading /scan

Recommended Tutorial : WifiManager + Emoncms (OEM) with ESP8266 (Temperature) #1
Conclusions
Although we have only done some testing, WifiManager is a good solution fast and easy it works correctly.
We are analyzing the methods used to add and store more parameters, according to the examples a Json file is created in which the parameters are written, this file “config.json” is saved in SPIFFS internal file system the ESP8266, and is written only when configuring parameters and is read every time the module is restarted.
We will try later on configuration functionalities we intend to integrate and both libraries in an application, we will test each one of the 2 versions, each version has its own characteristics.
In future applications we will begin to implement this library our tests.
Thanks to all the developers and collaborators of these libraries.
- If they have any input, suggestion, or have made commentary …
In next tutorials
we will integrate:
- esp8266 + WifiManager + Modbus TCP / IP
- esp8266 + WifiManager + Modbus RTU
- esp8266 + WifiManager + MQTT
- esp8266 + WifiManager + CoAP
Downloads
Arduino IDE Code example basic
Arduino IDE Code example parameters
References
Ola amigo, parabéns pelo seu trabalho, excelente.
Você tem ajudado muito no meu aprendizado.
Tudo funciona muito bem.
Estou tentando montar um projeto de controle de relay via web, usando o wifimanager.
Assim: Quando o dispositivo for lidado, e que seja salva as configurações das credenciais da rede, automaticamente ele começa a página web para controle do relay.
Pode ajudar?
Obrigado.
Olá ROBERTO CARLOS, Inicialmente obrigado, você tem 2 situações e eu vou te dar algumas sugestões:
1. Inicialize um servidor da web depois de configurar com wifimanager.
– Embora eu não tenha feito testes, eu recomendo este exemplo você poderia tentar https://gist.github.com/tzapu/ecc0759829d30d5a6152
2. Para controlar os relés do navegador, você deve enviar métodos POST, essa parte da interação deve ser bem projetado, pois um erro na atualização, se é apenas monitorar o estado dos relés não é tão complexo.
Este exemplo muito básico pode dar uma ideia:
http://www.martyncurrey.com/esp8266-and-the-arduino-ide-part-5-adding-wifimanager/
A desvantagem de criar outro servidor é que, se você não criar boa rotina poderia entrar confict com wifimanager, a coisa mais fácil poderia ser a de editar uma páginas não utilizadas existentes em wifimanager, mas o wifimanager servidor deve estar ativo sempre e não perto , tudo isso modificando a biblioteca.
Eu sugiro usar um aplicativo ou plataforma extra para segurança para controlar os relés.
Eu tenho mais aplicativos pendentes com wifimanager talvez algum dia eu vou tentar.
Saudações e subscr a nossa newsletter
Ola amigo. Muito obrigado pela resposta tão rápida e muito boa.
Testei os códigos Martyn Currey, excelente, tudo funciona bem. Somente achei que não é tão responsivo (speedy).
Em alguma vezes levou um longo tempo para a página web aparecer e o IP não foi tão rápido para responder. Por favor, quando você tiver tempo teste o código do Martyn e post um tutorial para nós.
Usei este exemplo que você me envoiu:
http://www.martyncurrey.com/esp8266-and-the-arduino-ide-part-5-adding-wifimanager/
Estou tenatndo montar um bom código para usar com este relay abaixo:
https://pt.aliexpress.com/store/product/ESP8266-5V-WiFi-relay-module-Things-smart-home-remote-control-switch-phone-APP-ESP-01S-relay/2174074_32830476353.html?spm=a2g03.12010615.8148356.24.266f38c5s0wMrH
obs:
1-alguns problemas que passei:
1- foi esta usando multiplas biblioteca wifimanager, usar somente a librarie wifimanager do Ken Taylor.
2-muito estranho, não consegui fazer o wifimanager funcionar em uma placa esp8266 (virgem), primeiro eu tive que servi-la com uma conexão web, onde ela “pegou” IP da rede, assim o wifimanager conseguiu funcionar a partir do último IP gravado no esp8266.
3-Coisas estranhas acontecem quando estou usando Wifimanager em mais de uma placa esp8266
muito obrigado pela grande ajuda, se houver algum avanço eu te aviso.
Olá
Existem 2 versões do Wifimanager do tzapu e ken taylor, o original é o do tzapu, decidi usar o tzapu já que ele parece ser atualizado com mais frequência, com melhorias na velocidade e eficiência.
Eu realmente não sei se Wifimanager é executado em uma determinada esp-01 que não tem os 4mb do esp8266 12E / F (Nodemcu v3), você já testou.
Usando um servidor web criado com o exemplo do Arduino ide eu não acho que é muito eficiente e vai travar porque é uma versão muito simples e as vezes ele aguarda por conexões e talvez as vezes eu não consigo executar o código, pessoalmente recomendo que outro aplicativo centralize, olhe para este teste.
http://pdacontrolen.com/wifimanager-emoncms-oem-with-esp8266-temperature-1/
Embora possa haver exemplos de servidores da Web mais otimizados, mas não se eles forem compatíveis com o wifimanager.
Saudações
Ola amigo.
Um detalhe importante que eu esqueci de comentar, que tive problema de conexão com o meu roteador wifi. Culpa minha, eu esqueci e deixei o sistema de encriptação (segurança) em automatico, com isso a placa esp8266 não estava conseguindo se conectar a minha rede wifi, depois que eu mudei para( SECURITY- WPA/WPA2/PERSONAL) , (VERSION- WPA-PSK), (ENCRYPTION-TKIP), no reator tudo funciona bem agora.
hello
i am having some trouble with the wifimanager,
with ken taylors version it does not save the cridentials put in so everytime you turn off and back on the board you have to reenter it all which does not work for me
what i really need is in the wifimanager for it on the save page to simply show the ip address assigned to the board (like it does in kens version) is there a way to fix this so it does? can someone help me with the code fix?
or is there away to set a fixed ip of the board which is where i have a config page for my users to make their settings changes, but the board still able to access the internet as well. my issue is that it will be used my multiple users on multiple networks so is there a safe ip for a setting page like the 192.168.4.1 that i for the wifimanager can i make an ip like 192.168.5.1 or something for my users ? if so how do i do this? can someone help me with the code