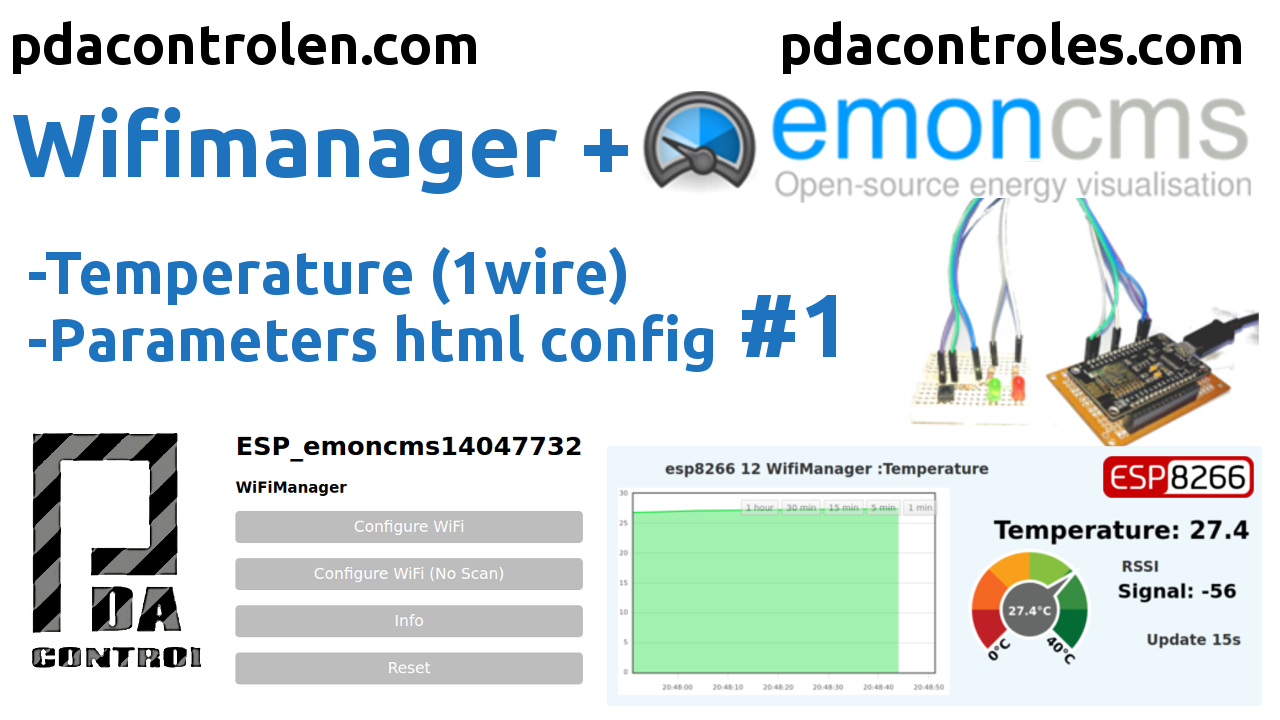
The following implementation using an ESP8266 module and a temperature sensor ds18b20 allows the configuration and sending of data to Emoncms without requiring to modify or edit a line of code, facilitating the creation of parameterizable applications.
After testing the Wifimanager libraries, which allow an agile configuration of the network credentials and additionally allow to add parameters or initial configurations before running the final application, in this case we will use the WifiManager version created by tzapu – creator.
Tutorial Recommended: Introduction library WifiManager
The idea is to implement this library in more future integrations and create a kind of wifimanager base template for those who want to test and add parameters is easier.
Tutorial disponible en Español: WifiManager + Emoncms (OEM) con ESP8266 (Temperatura) #1
Introduction
This implementation in Arduino IDE for ESP8266 is very useful to not require that you download firmware or modify code if the network credentials change, making it easier to take our application to other available networks.
In this tutorial we will use WifiManager as a configuration medium and integrate it with an http / json client that sends data to the Emoncms platform, in this specific case we will only perform connection tests on a local network.
Upcoming implementations
In this case we will implement the emoncms connection, but it is also possible to modify the code to create connections with other platforms: blynk, cayenne, adafruit.IO, thinger.IO, aRest, Thinkspeak, MQTT, CoAP among others. protocols Modbus TCP / IP, Modbus RTU, Mewtocol.
Tutorial disponible en Español: WifiManager + Emoncms (OEM) con ESP8266 (Temperatura) #1
Emoncms (OpenEnergyMonitor)
For a long time we have tested with the Emoncms platform belonging to the OpenEnergyMonitor project, in a nutshell it is a web platform and tool for collecting and analyzing data referring to consumption of electric, solar, wind, thermal ..
More information in the following Tutorial: Installation of Emoncms Platform in linux
Full Information: OpenEnergyMonitor.org
Recommended: I have created these playlists which contains a lot of PDAControl tests with Emoncms.
Application
This is the first integration we made of WifiManager with a specific application “Emoncms”, since it is an initial test we performed the most basic, it is not unknown that the api of emoncms easily allows to send multiple “sensor” values to emoncms but in this case we will start by creating the code for the configuration and parameterization for sending a single sensor or input, in case it is only in detail analyze and modify the code.
Tutorial disponible en Español: WifiManager + Emoncms (OEM) con ESP8266 (Temperatura) #1
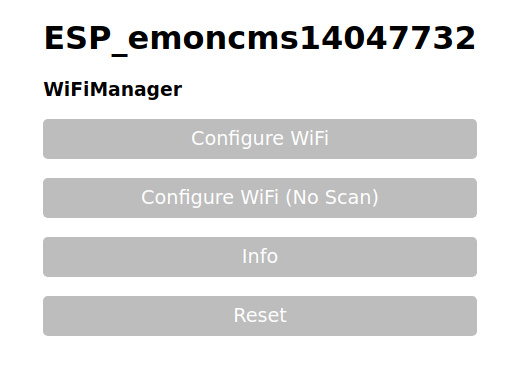
WifiManager
Create a form that will perform the following functions:
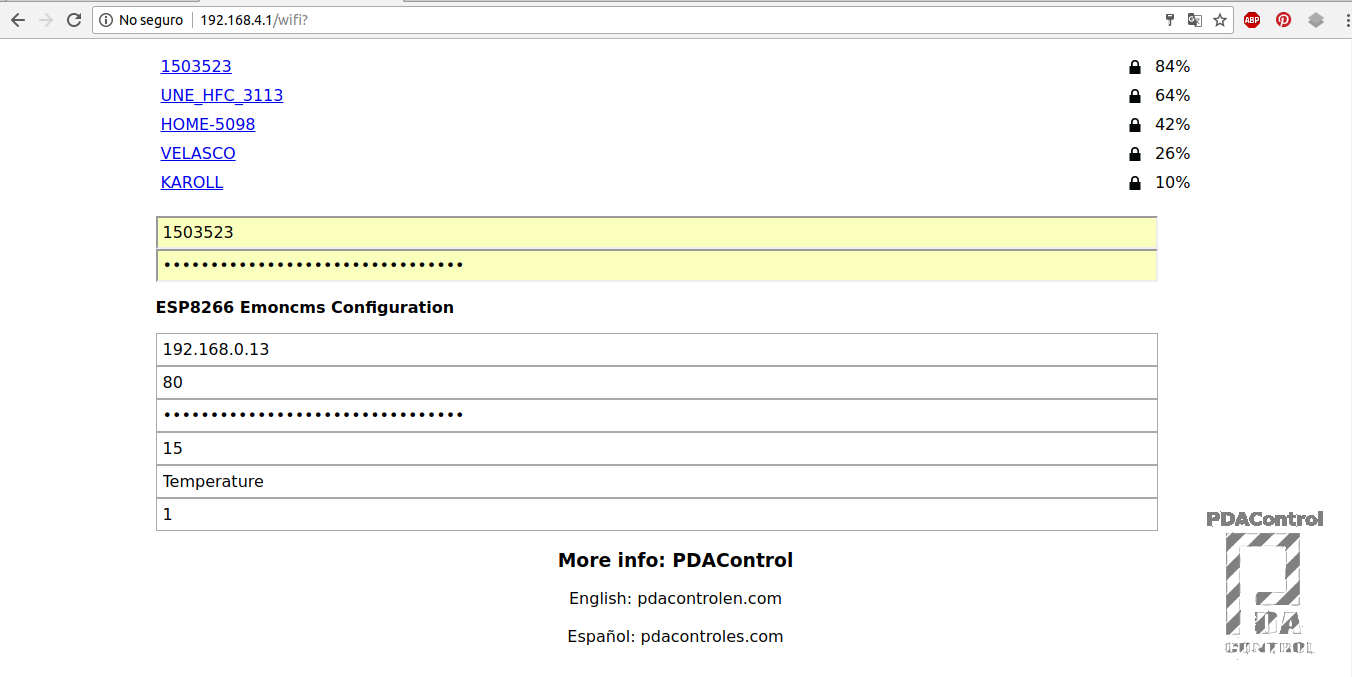
Configuration of Network Parameters “SSID” & “PASSWORD” from web form.
We have added 6 fields HMTL input to our form to enter more parameters required in this specific case for our client Emoncms.
More information: custom WifiManager parameters.
Parameters created for Emoncms client:
- host or emoncms server allows IP address and host or dns: “192.168.0.13” or “serveremoncms.com”.
- emocms server port, default: “80”.
- apikey or authentication key for writing / reading emoncms.
- time sent data in seconds: “120”.
- variable name or sensor, in emoncms input: “sensor02_temperature”.
- emoncms node, is the group to which we assign the sensor: “1”.
Note: Download Example code “Basic example esp8266 WifiManager” available in the bottom of the article ..
Emoncms http client
An http/json client has been created which sends data to emoncms with the following characteristics:
- Creating a TCP/IP client “WiFiClient”.
- Connection to Host “Emoncms ” (! Client.connect (host, port)) “.
- Reading of variables or sensors “Temperature = float celsius = sensors.getTempCByIndex (0);”.
- Creating json according to example features: Input API emoncms.
- Send json as request to server emoncms client.print (String (“GET”) + json + “HTTP / 1.1 \ r \ n” …..
- timeout connection 5s or 5000ms in case of no connection retry.
- Print on the terminal Server response “200 ok”.
Fragment of code connection of client Arduino ide.
// get temperature ds18b20  - capturar temperatura ds18b20   /// Onewire
sensors.requestTemperatures();
float celsius = sensors.getTempCByIndex(0);
Serial.println(sensors.getTempCByIndex(0));

/// RSSI -esp8266
long rssi = WiFi.RSSI();

/// JSON/HTTP Emoncms
Serial.println("json");
String json ="/emoncms/input/post.json?node="+String(nodedata)+"&json={"+String(inputname)+":"+ String(celsius)+","+"RSSI:"+String(rssi)+"}&apikey="+apikey;
Serial.println(json);
Serial.println("");

 // This will send the request to the server emoncms
client.print(String("GET ") + json + " HTTP/1.1\r\n" +
			  "Host: " + host + "\r\n" +
			  "Connection: close\r\n\r\n");

///////////////// timeout 5 sec - sin respuesta de servidor.. //////////////////////
 unsigned long timeout = millis();
while (client.available() == 0) {
  if (millis() - timeout > 5000) {
	digitalWrite(pin_led_App, LOW);
	Serial.println(" --- Client Timeout !");
	client.stop();
	return;
  }
}

// Read all the lines of the reply from server and print them to Serial
while(client.available()){
  String line = client.readStringUntil('\r');
  Serial.print(line);
}

Serial.println();
Serial.println("closing connection");

delay(updatedata*1000);  /// update data  sec * 1000ms
////////////end void main/////////////
More information: complete documentation api emoncms
Note: Download “Example Connection basic esp8266 emoncms” available in the bottom of the article ..
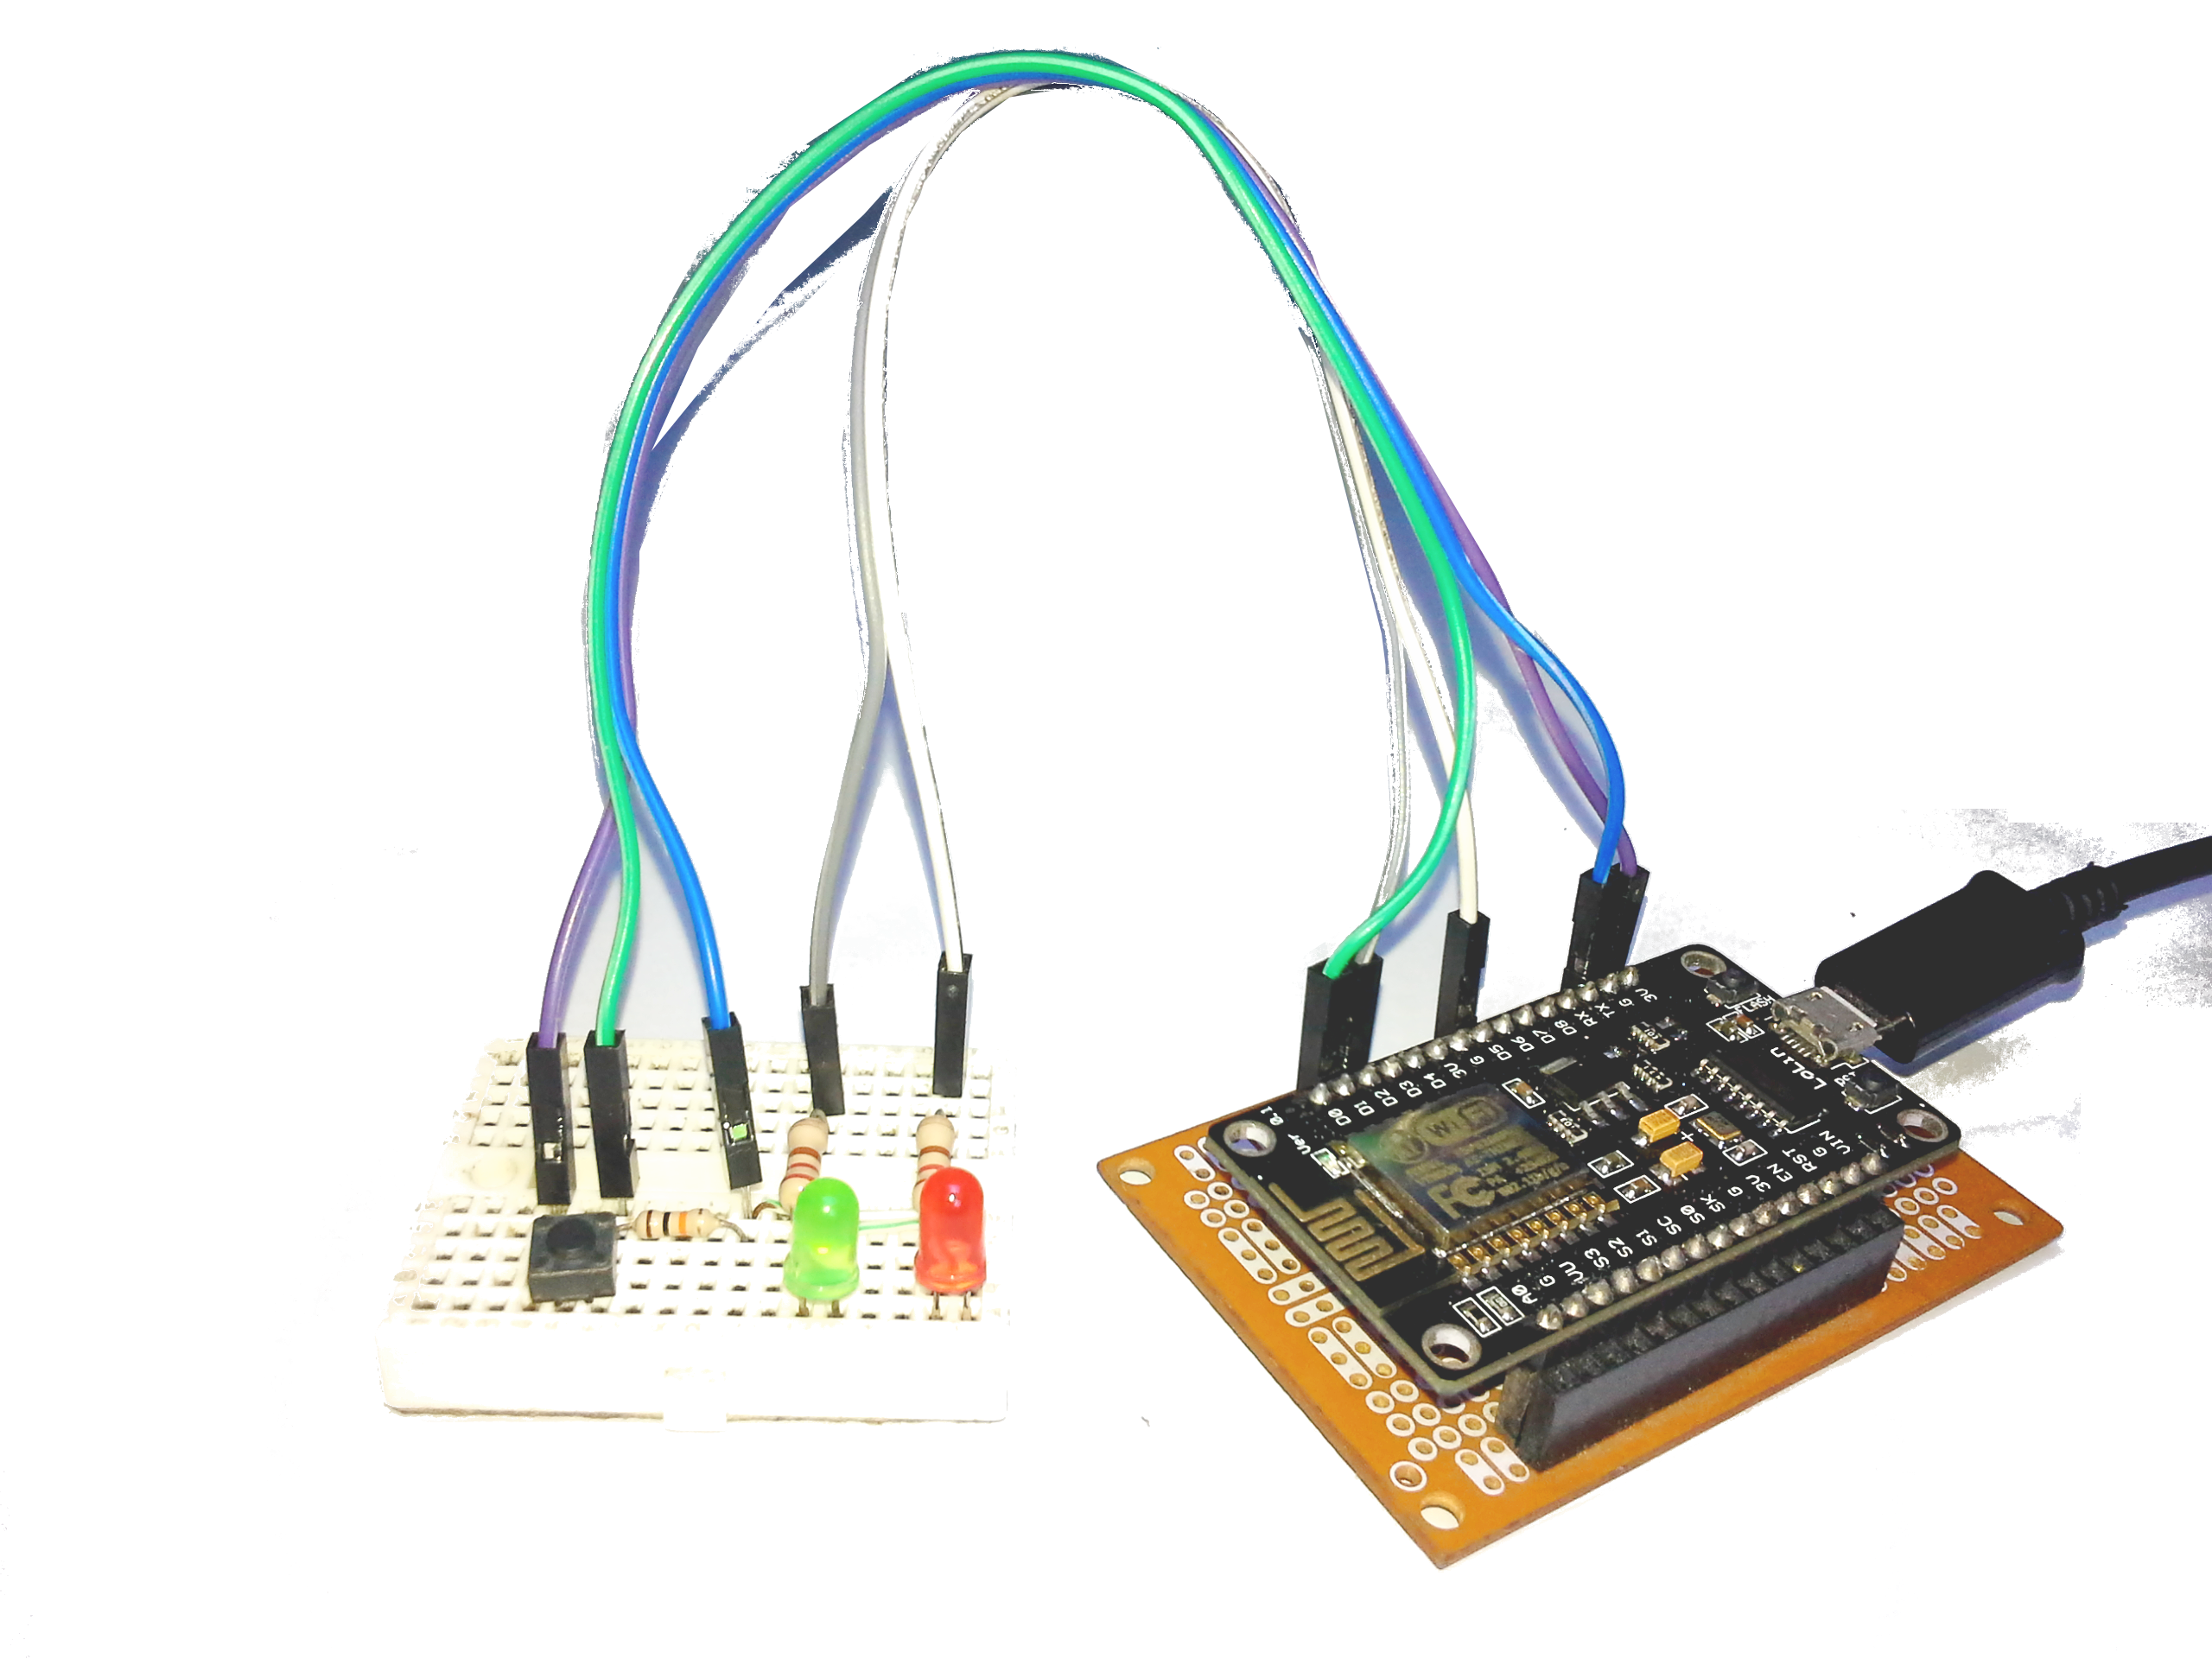
Materials and where to buy
- DS18B20 Temperature Sensor
- ESP8266 12E V3
- 1 resistance 3.3K
- 2 resistors 220 Ohm
- 1 10k resistor
- 1 red led diode
- 1 green led diode
- 1 pushbutton Normally open
Connections

Settings
To enable parameterization from wifimanager we have added 1 pushbutton and 2 led diodes to indicate application status or operation.
- Normally open button: “WiFi Config”: it allows to enable the configuration and parameterization of the ESP8266.
- Red LED: On indicates ESP8266 in “WiFi Config” mode or WifiManager enabled.
- Green LED: On Indicates that the application code in this case the Emoncms http client is connected to the server correctly.

Mode 1: Connection and Correct Setup
Application connected to Emoncms or client application running correctly, specifically indicates that the connection and / or sending of data has been successful.
- “WiFi Config” button = without pressing
- Green led diode = ON
- Led red LED = OFF
in this case the module should be sending the data to emoncms and allow the visualization of the data in the platform.
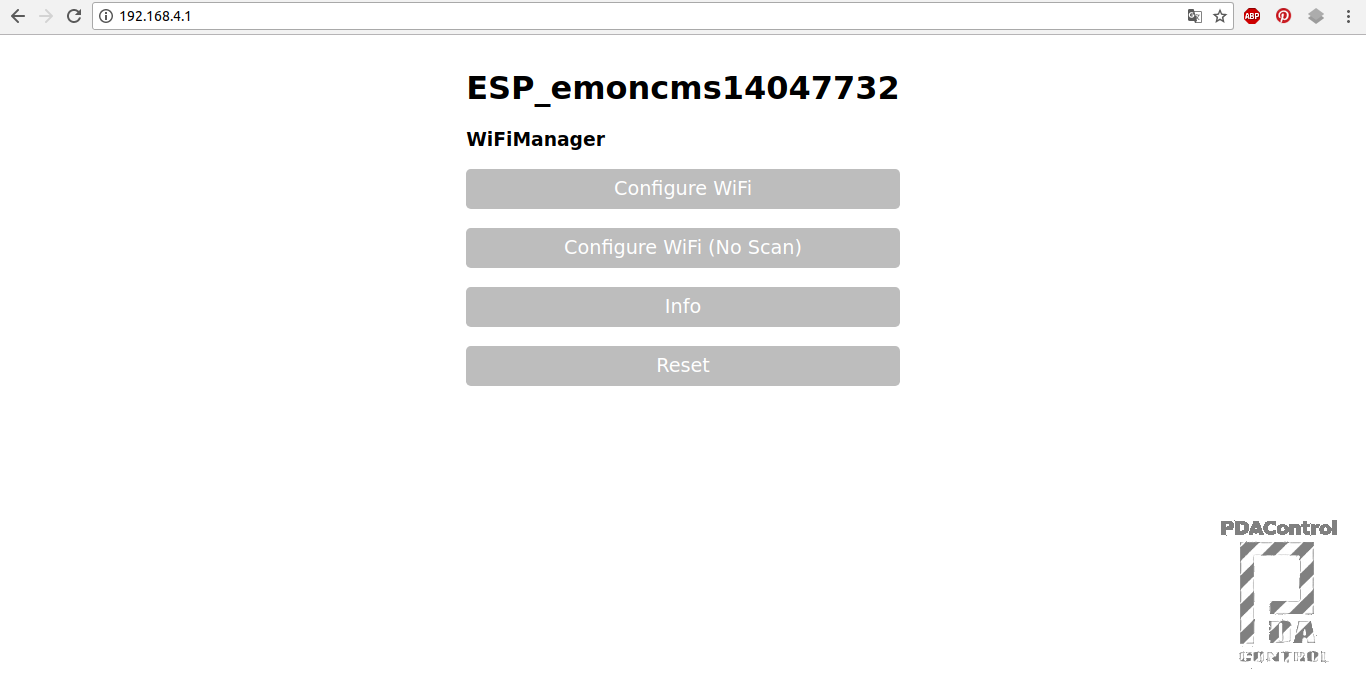
Mode 2: Enable Configuration from WifiManager
To configure the module from WifiManager, perform the following sequence.
- Press and hold: “WiFi Setup” button.
- Press 1 time button “Reset” of module esp8266.
- Release: “WiFi Config” button.
- Green led diode = OFF
- Led red LED = ON
- The module automatically switches to AP mode and enables the network “ESP_emoncmsxxxxxxxx”.
Note: the 8 digits correspond to the proper ID of each esp8266.
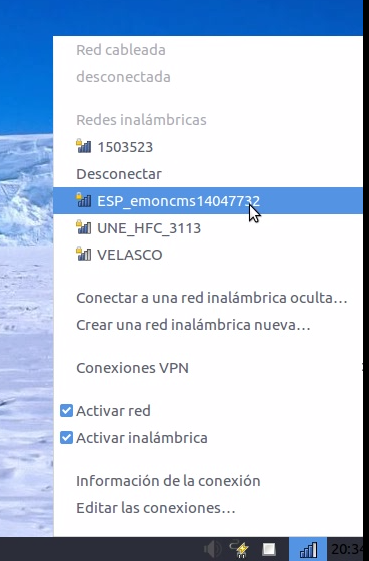
- Connect and enter the address 192.168.4.1 from the web browser of your choice.
Mode 3: Error Network Connection or Client-Server Connection
- Green Led Diode = (flashing or blinking)
- Led red LED = (flashing or blinking)
If both LEDs flash continuously 1 or 2 sec, if flashing does not stop flashing may be one of the following causes.
- Physical connection Wifi: The wireless router or wireless router, the network is not available cases (Off, disconnected) without Internet connection in case of connecting to an emoncms server on the Internet.
- Server connection Emoncms: The application or http client connects to emoncms “Apache” in case there is no such response from the server fails connection.
Note 1: If any of the connection problems are solved, the module will automatically connect to the application.
Note 2: It is also possible that at the start of the module (connect or power) the blinking of the diodes lasts for a few seconds while connected to the network, it is normal.
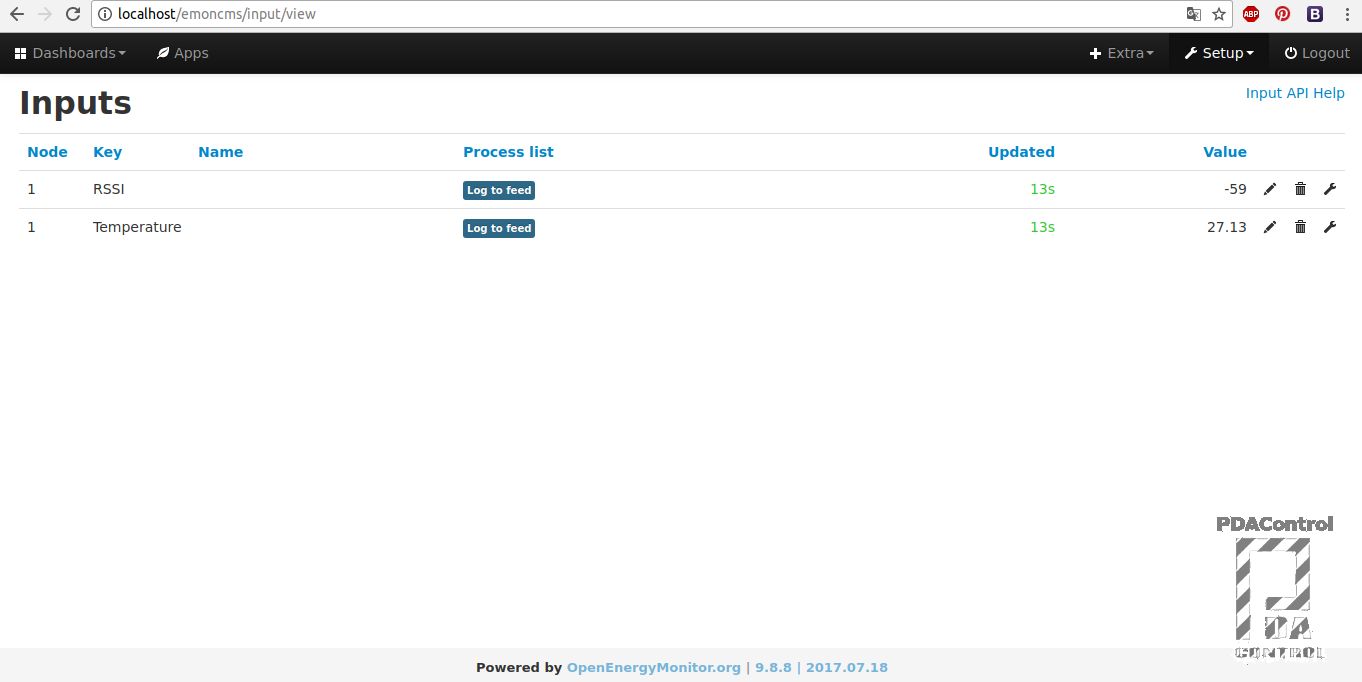
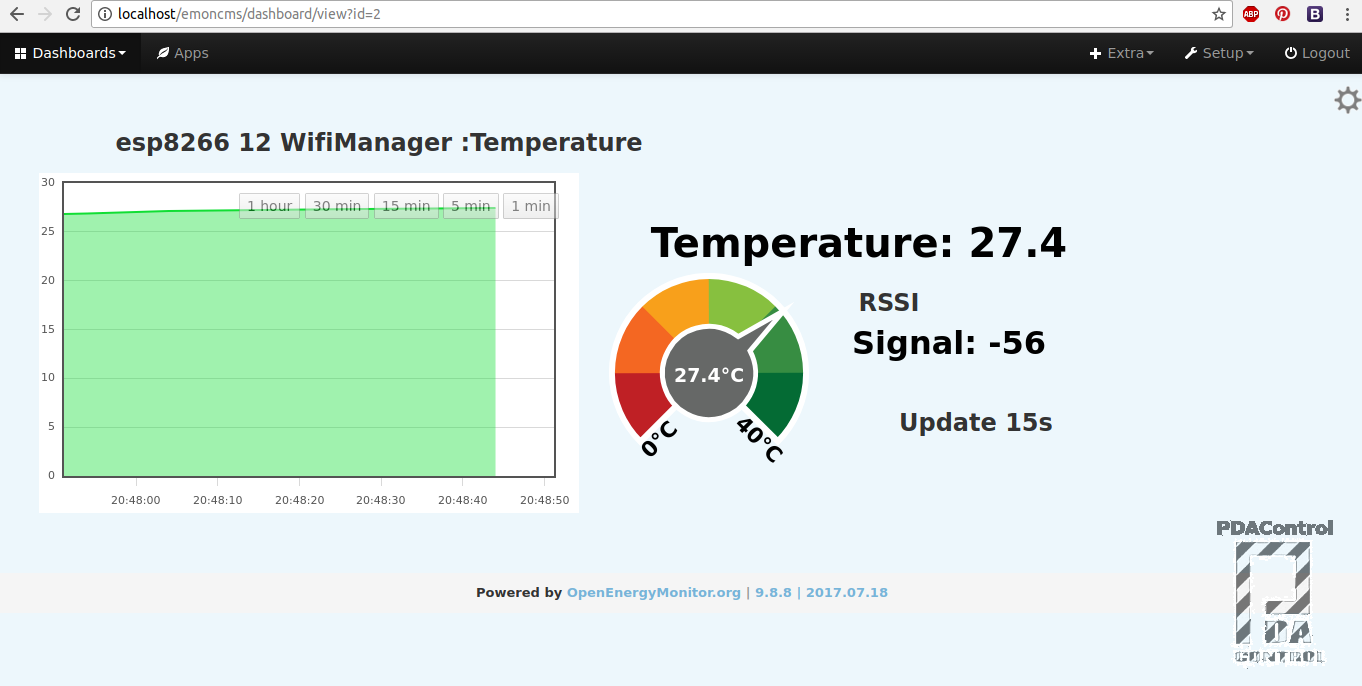
Preview Emoncms
The module esp8266, after being configured correctly, sends the temperature and also sends the RSSI indicating the signal strength of the network received.
- Temperature
- RSSI
Inputs
The client http/json esp8266 will always send the data directly to inputs, the method is determined by the API Inputs.
Full information: API Inputs Emoncms.
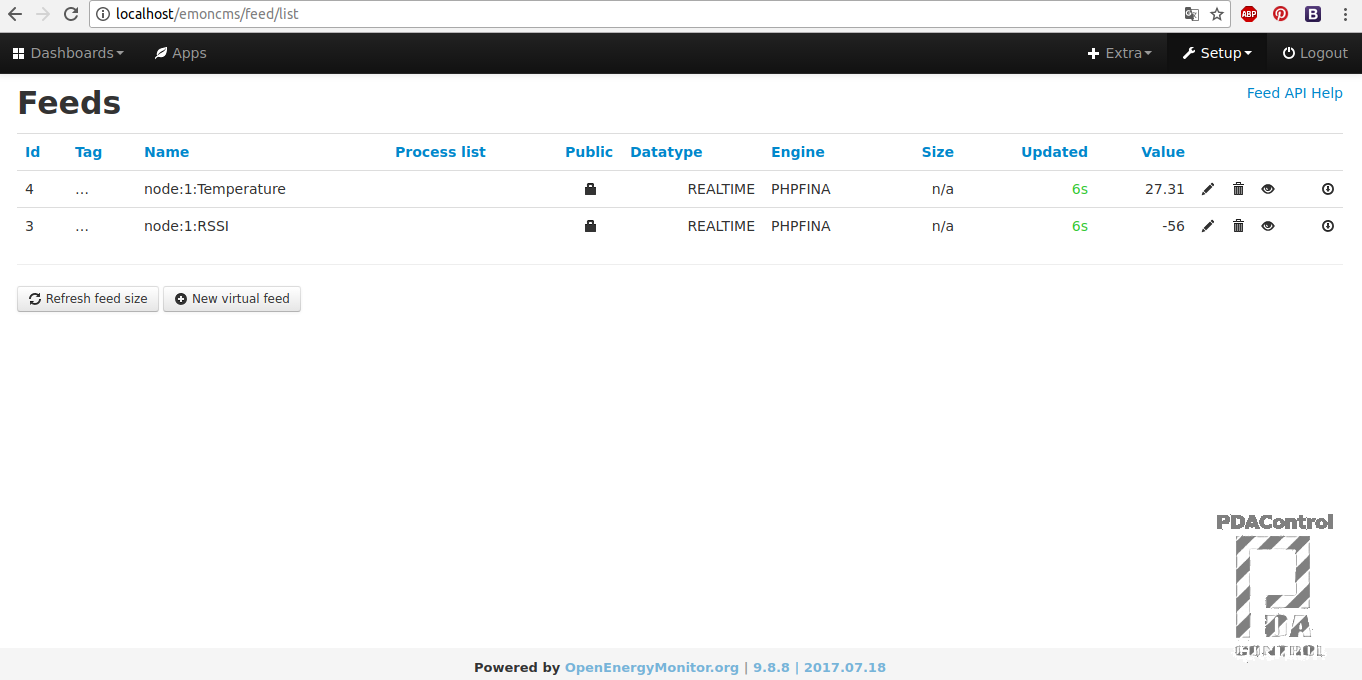
Feeds
The input must become a Feed to be configured in a process associated with the variable or variables “temperature, RSSI” which allows to adjust, integrate, parameterize register or store among many available functions, in this case log to feed, for the later creation of dashboard, graphs and historical.
More information: API Feed Emoncms.
Dashboard
Manage and create dashboard.

Dashboard Editor
It allows to associate the Feeds to Widgets and the great variety available graphics.
More Information: Dashboard OpenEnergyMonitor.
Tutorial full test
WifiManager + Emoncms + ESP8266, Configuration and measurement # 1
We will explain the operation of a practical way of configuration and connection.
WifiManager + Emoncms + ESP8266 Configuration and Connection # 2
Connection with the 3 variations of Emoncms, if editing code we can send data to any of the 3 versions.
Connection with 3 variants available from emoncms
Regarding the tests performed with emoncms, it connects without problems with:
emoncms local
Version installed on pc, in this case sent data every 10 seconds, since it is my home network, I can “bombard” without limitations, it could be said that it depends on the resources of the computer either Raspberry pi, Beaglebone or preferably a PC “Linux, windows, etc”.
More information in the following Tutorial: Introduction and Installation of Emoncms Platform in linux
emoncms.org
Hosting available property of emoncms, I have created an account, although I only use it for quick tests, I personally try not to abuse the frequency of sending data, I do not really know the conditions exist for sending data. although I suppose it should be mounted on a superhosting, although emoncms.org does not use HTTPS or TLS has a built-in transport layer encryption in which the apikey emoncms is used as pre-shared key to encrypt data with AES-128-CBC. …. all that means safe data.
Full information: API Inputs Emoncms.
emoncms in Hosting
Hosting + Domain payment service, I have decided to set up my own platform on the Internet, there are a variety of plans and hosting packages in case I require an Internet service but remember quality = costs, given that being an Internet service, in case of acquiring it should be taken into account the “available bandwidth” and frequency of sending data per user, installing emoncms is very easy since it has a CPANEL to configure below documentation and considerations to take into account.
Recommended Tutorial: Quick View to Emoncms Platform OpenEnergyMonitor in Hosting
Recommendations
On this occasion, I would recommend downloading and testing, I have taken the task of commenting on the Arduino IDE code for the most part for a better understanding.
Tutorial disponible en Español: WifiManager + Emoncms (OEM) con ESP8266 (Temperatura) #1
- Download “Basic example esp8266 WifiManager” to analyze and understand the parameterization process with Wifimanager, to use as a template for your projects.
- Download “Basic connection example esp8266 emoncms” is a basic example to analyze the method of sending of data used by Emoncms.
- Download Final version “Example WifiManager + Emoncms + Temperature” is technically the union of the 2 previous examples, although some improvements have been added with their corresponding comments. It is the version used in the tests.
Note: Downloads Arduino IDE code available below.
Base Code
For the code, take the AutoConnectWithFSParameters.ino example of WifiManager created by tzapu.
- Mainly analyzed the implementation method to save data in data in the SPIFFS file system, more information: save settings
- I organized the code to facilitate the functionality and added a button to enable the configuration.
- The Parameterization examples were analyzed, specifically the example code AutoConnectWithFSParameters.ino, to create new fields or parameters were simply copied and modified taking into account the type, size among other things, more information: Custom Parameters.
- The HTTP client that connects with emoncms was tested and the code was added to void main () and the captured parameters were converted to the variables required by the client.
- It was implemented the HTML injection in the configuration parameters specifically in the form to give it more dynamism and some restrictions from html “maxlength = 10 type = number, min = max = 9999, type = password”, more information: custom HTML, CSS , Javascript.
Parametrization
To implement the code and to make modifications, the following must be taken into account:
- To add parameters I recommend only to modify the following fields trying to “copy and paste” then edit and / or create parameters.
- To take into account mainly is to create new variables and to replace the type and the length of the variable and / or parameter according to necessities.
///inicializacion de parametros /// initialization of parameters
char char_server_emoncms[40]="serveremoncms.com";

///lectura de valor desde json /// reading value from json
strcpy(char_server_emoncms, json["char_server_emoncms"]);

/// Agrega input HTML a formulario /// Add HTML input to form
WiFiManagerParameter custom_server_emoncms ("char_server_emoncms", "server emoncms", char_server_emoncms, 40,"title= \"server or Host Emoncms \"");

///adiciona input HTML /// add HTML input
wifiManager.addParameter(&custom_server_emoncms);

/// captura valor de input /// capture input value
strcpy(char_server_emoncms, custom_server_emoncms.getValue());

///save the custom parameters to FS ///
json["char_server_emoncms"] = char_server_emoncms;

///print serial
Serial.println(char_server_emoncms);
- Do not edit or modify the SPIFFS function code or json functions regarding write / read parameters.
IMPORTANT: If you delete or create parameters, you must format the SPIFFS file system, if it is not formatted, the esp8266 will not be able to read and write the config.json file, resulting in an error or a restart of the module indefinitely:
- uncomment the line “SPIFFS.format ();”
- download code to esp8266 will delete the file config.json
- again comment “SPIFFS.format ();”
- download code to esp8266.
Features
HTML form
To make improvements in web design it is necessary to know a little about the attributes and functionalities of the forms in html, I have taken as a basis and method of debugging the tutorials of www.w3schools.com.
Much has been tried to implement some restrictions in the html form, so far they are very basic such as:
- Restriction of parameter length entered.
- Entry constraint only numeric type variables, according to the required field example: node.
- Entry constraint only alphanumeric type variables, depending on the required field example: host.
- Restrict view or hide for variables type password example: apikey.
- Additional restrictions have been added in arduino ide code in case of entering an empty field, not allowing connection.
- In order to not use the html <h1> </ h1> or <p> </ p> tags in the parameters since the design is altered since it inserts <br>, the title attribute was used in the form fields, view the information by placing the mouse over the field, eg: atribute title html.
WifiManager implementation: Custom Parameters.
Note: the input field does not leave spaces in the input name to use a separator example “temperature_now” “pressure_zone1”, if the input has spaces ” ” when sending emoncms will reject the data.
Improvements
Add more fields to send more variables using Bulk data mode for massive data sending, allowing you to efficiently upload multiple updates from multiple nodes and data. More information: API Inputs Emoncms.
Add parameterization and / or configuration of pins according to the sensor, although such dynamism is required for a large implementation that requires it, otherwise it is not profitable, I recommend focusing on configuration and / or connection via Wifi.
Maybe add a logo, modify the ccs styles, in my case make a test by changing the color to gray.
Although some functions of the WifiManager library created by Ken Taylor such as the creation of an HTML checkbox is not available or implemented in WifiManager of Tzapu, I will try to migrate or test those functions and test if there is possibility to add perhaps drop-down menu and other HTML attributes, I only speculate.
Conclusions
Of course there are other methods, some will say more efficient means to program the esp8266 or do this implementation and but, I have decided to explore the WifiManager scope and it has seemed a very good solution, very practical for applications with Arduino IDE, for people who have already performed some tests.
In order for them to create their own implementations, I would say that although the code seems long and a bit complicated, technically “complicated does not require modifications “after reading the library documentation in github, it is simpler and again I recommend the basic examples “available below” .
The parameters are stored in the SPIFFS file system, if you turn off or restart the module the parameters will not be lost.
This is basic test “for the tutorial to be as explanatory as possible” with the examples simply add parameters, read more variables, build the http / json and send more data to emoncns.
Next integration “WifiManager + ModbusTCP/IP Slave” …
Finally I hope someone will serve you this information, they are initial tests if someone tests or has suggestions or recommendations please comment that they will be well received.
Thanks
Thanks to Tzapu creator of the library WifiManager and to all the people that contribute with this project.
Acknowledgments to Founders and Project Managers Emoncms: Trystan Lea and Glyn Hudson thank you for sharing and raising awareness.
Downloads
IDE Arduino Code:
- Example Basic connection esp8266 emoncms: Basic example of client Emoncms in esp8266.
- Example Basic esp8266 WifiManager: Basic template configurable WifiManager.
- Example WifiManager + Emoncms + Temperature
- WifiManager Libraries by Tzapu
References
- Playlist Emoncms IoT Control
- Playlist Emoncms explained
- Introduction Library WifiManager
- Introduction and Installation of Emoncms Platform in linux
- OpenEnergyMonitor Project
- tzapu.com
- WifiManager Github
- www.w3schools.com.