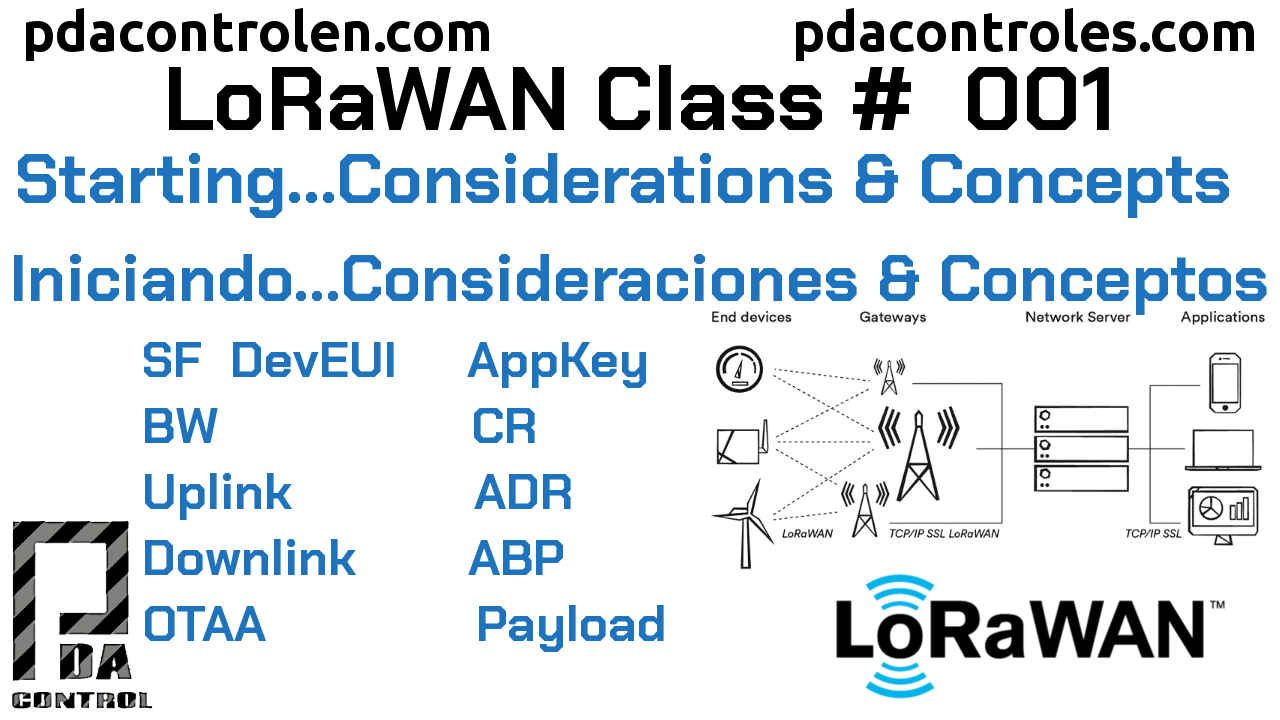
PDAControl has proposed to carry out tests and documentation to allow you to create your own LoRaWAN network and not fail in the attempt, before starting tests we want to analyze and make some clarifications, on basic concepts that we must take into account before starting to connect and program.
In this tutorial we do not pretend to be very technical, but we will not pass up very important details about LoRaWAN, if you want more detailed explanations I recommend watching tutorials by Andreas Spiess and Mobilefish.com by Robert Lie, these video tutorials will be an excellent more detailed complement.
Recomendado: Este artículo en Español, Introducción, consideraciones y conceptos LoRaWAN
Components of a LoRaWAN Network
These 4 components have been determined in a LoRaWAN network:
- nodes (sensors / actuators): are the end devices that send and receive information to the gateway.
- gateways (data addressing): are responsible for receiving and sending information to the nodes to servers and vice versa.
- Network of Servers: they are those that allow the administration of nodes, gateway from applications, that allow to see the data.
- Applications: allow the integration of final applications to manage or visualize data (Example Node-RED).
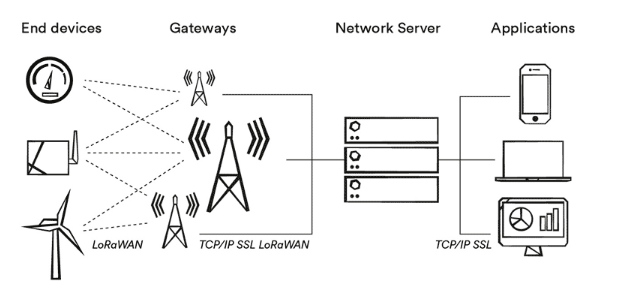
LoRaWAN Topology: Star.
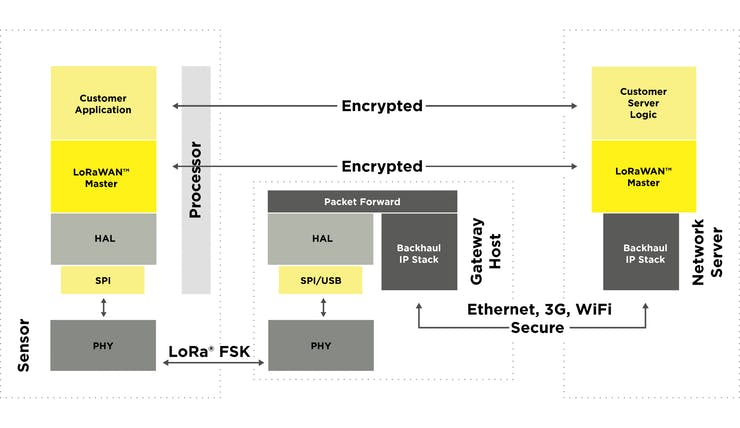
LoRaWAN Architecture
Node Classes
LoRaWAN has classified its nodes or end devices into 3 classes according to their energy efficiency (battery consumption) and message reception windows.
- Class A (baseline): They are the ones that consume less, they only receive after sending.
- Class B (Beacon): Consume more than class A, the nodes are synchronized to allow reception.
- Class C (Continuous): They have a high consumption but are always available to receive messages.
In our tests we will use class A nodes.
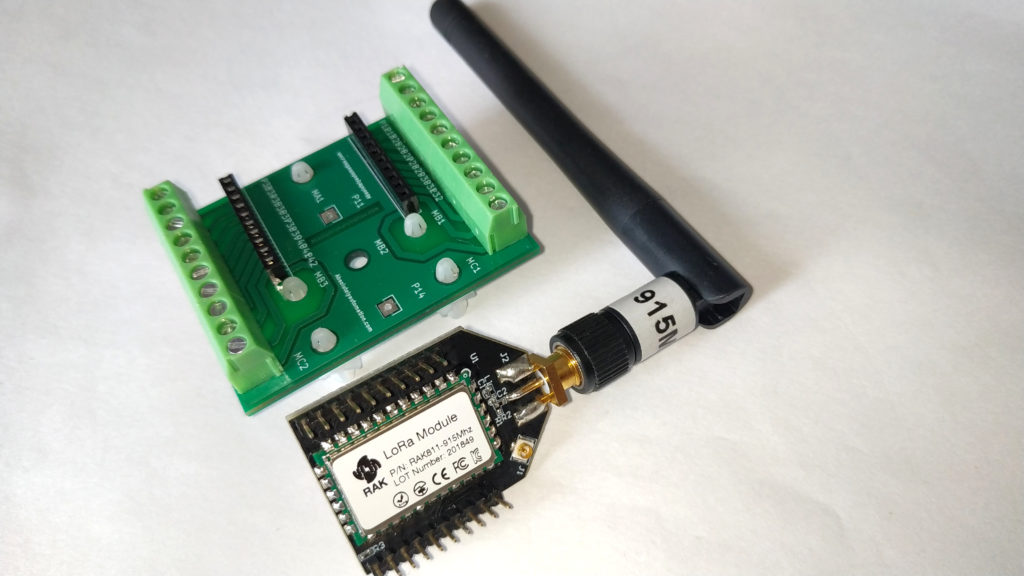
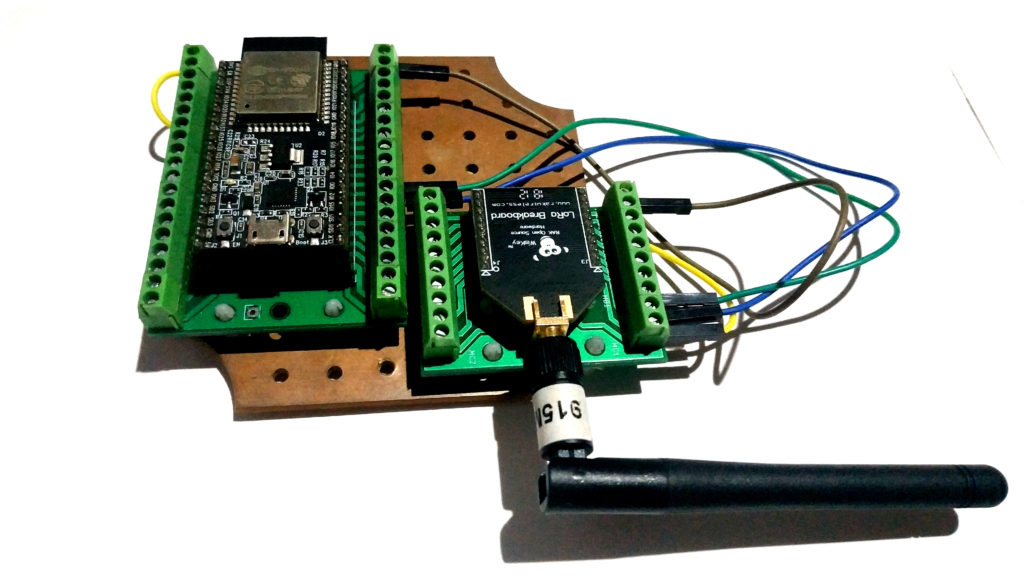
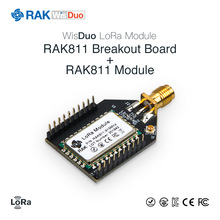
1- ESP32+ RAK811 (AT command) (915mHz)
Gateway classes (Channel Single) Vs Gateway (Multichannel)
If you want to make an important functional LoRaWAN implementation first step buy multichannel gateway, It is also characterized by indoor and outdoor gateway, that depends more on the robustness for weathering.
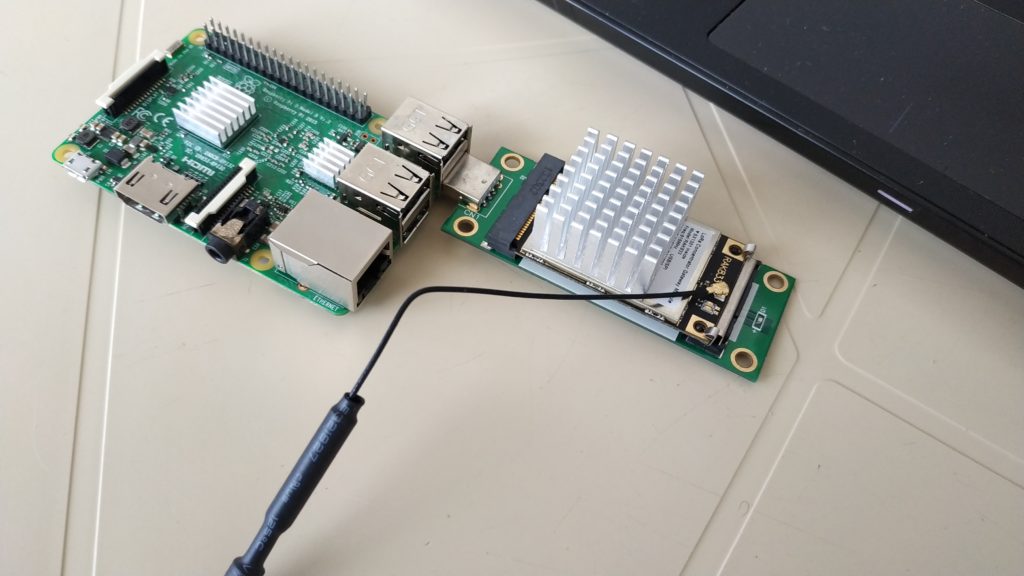
In my case I have an RAK833 gateway with 8 channels at an affordable price, there are other multichannel solutions on the market.
Raspberry Pi 3 + mPCIe to USB + RAK833 SPI/USB
Even a while ago, perform tests with Gateway 1 single channel (ESP8266 – Rfm95), determine that they are only implementations for very basic initial tests and a single channel only serves for a single node, in real life it is not functional, technically among more channels , greater number of simultaneous connections or greater number of nodes (sensors).
Recomendado: Este artículo en Español, Introducción, consideraciones y conceptos LoRaWAN
LoRaWAN servers
Currently there are several LoRaWAN servers, both open source, public networks and also allow us to create our private networks, below a list of some free servers and / or platforms and others are PaaS paid services:
- RestIoT.io
- The Things Industries.com
- actility.com/LoRaWAN
- LoRaWAN Server by gotthardp (Open, Create private networks)
Initially we have already had previous tutorials with these two servers:
- The Things Network.com (Open network)
LoRaServer.io (Open, Create private networks)
Packet Forwarders
A LoRa packet forwarder is a program that runs on the host of a LoRa gateway (gateway) that forwards RF packets received by the hub to a server through a UDP / IP link, and emits RF packets sent by the server, basically it takes the Lora frames of the nodes and converts them to UPD / IP for the server, this happens in the Gateway.
Materials
In future tests we will use the following devices to create our LoRaWAN network.
Important: Before buying check the frequency of your Country, Region or Zone.
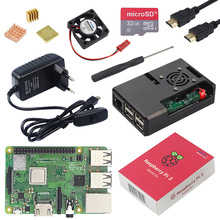
Raspberry Pi 3 o 4
Gateway LoRaWAN 8 Channels RAK833 by RAK Electronics

LoRaWAN Node RAK811 (AT Commands)
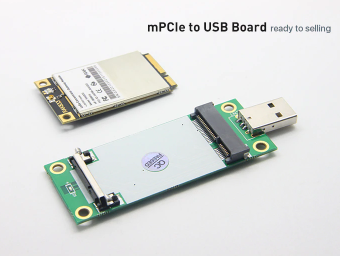
Converter board mPCIe to USB for RAK833
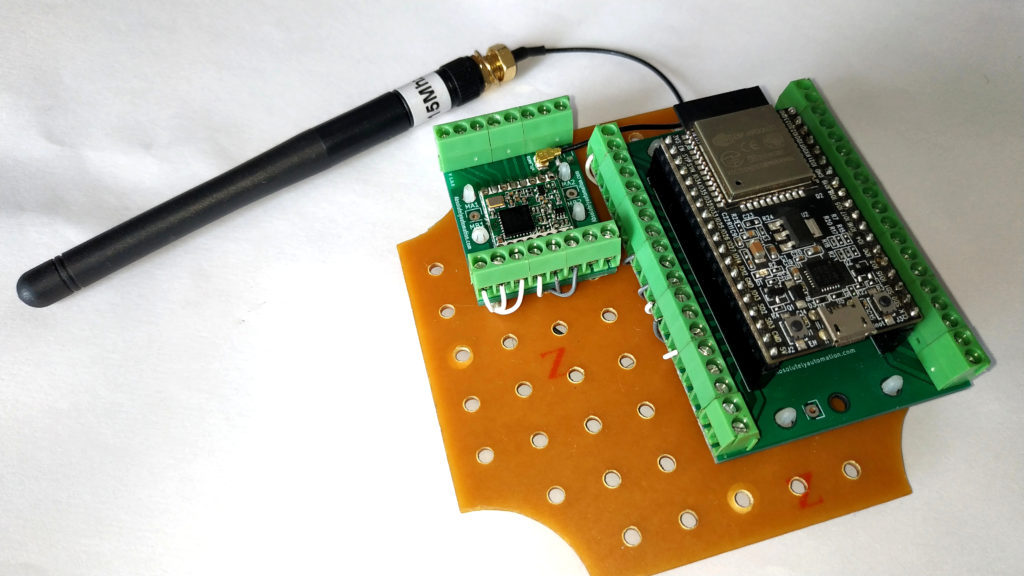
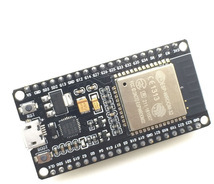
Module ESP32 ESP-WROOM-32
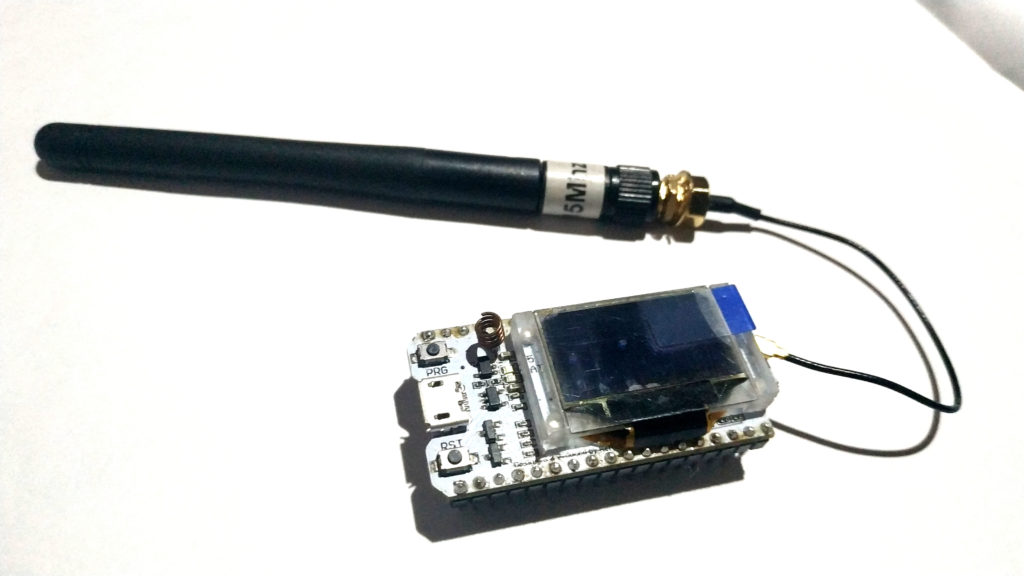
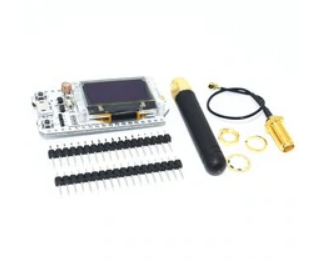
Module ESP32 LoRa HELTEC – 915 MHz
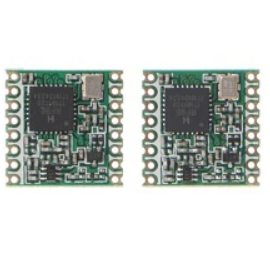
Module/Radio RFM95 Hope Electronics 915Mhz
Other Recommended LoRaWAN
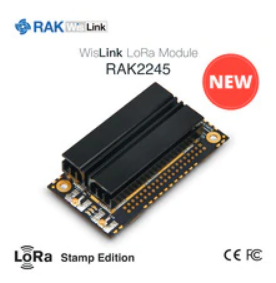
RAK2245 LoRa Pi Hat GATEWAY LoRa LoRaWAN
LoRaWAN Button RAK

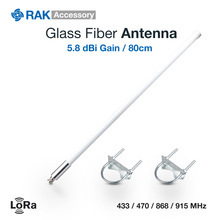
Antenna 5.8dBi Fiberglass LoRa LoRaWAN
LoRa ISM frequencies
The ISM (Industrial Scientific & Medical) frequencies are free of licensing frequencies, each country has free but limited frequencies of power and transmission time.
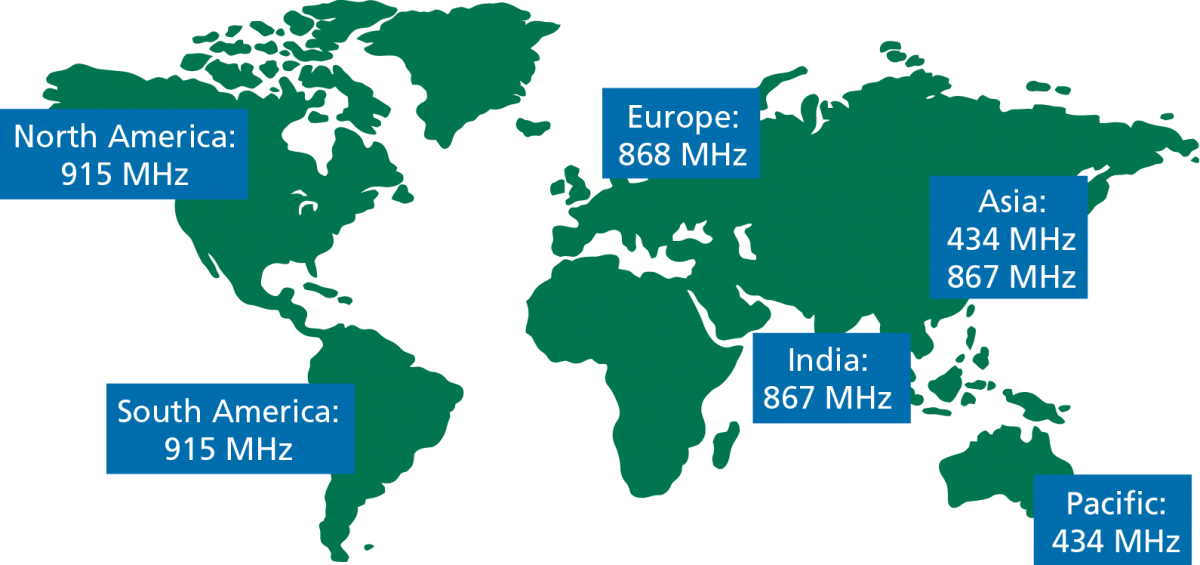
Warning: these frequencies must be respected and you are required to search, study and comply with the regulations of your own country.
The Things Network has determined frequency ranges for LoRaWAN for each country, LoRaWAN Frequency Plans and Regulations by Country.
LoRa Alliance has defined a more complete list with the LoRaWAN Regional Parameters frequency regulation.
In the case of my country Colombia, in America frequency of 902-928, applies (AU915-928, US902-928).

Recomendado: Este artículo en Español, Introducción, consideraciones y conceptos LoRaWAN
Channels and Sub-bands
LoRaWAN has standardized ordered and grouped frequencies in channels and sub-bands, in the real case:
- Europe uses 868 MHz frequency there are 10 channels available
- America uses a frequency of 915 MHz there are 64 channels available
The Things Network has a list describing the LoRaWAN bands and sub-bands channels assigned for each LoRaWAN Frequencies Overview region, IMPORTANT: verify yours before purchasing your devices.
In the case of America, 9 channels for Uplink and 8 channels for Downlink.
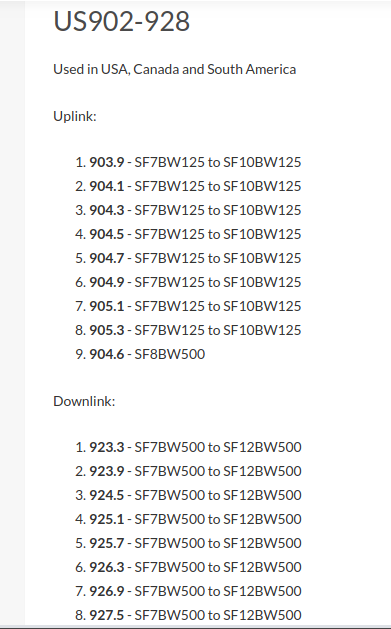
This table is more complete and descriptive, shows all the existing channels for America, the specific case of the US that use 64 channels, in our case we will use 8 channels for our RAK833 Gateway.
Each sub-band has 8 channels.
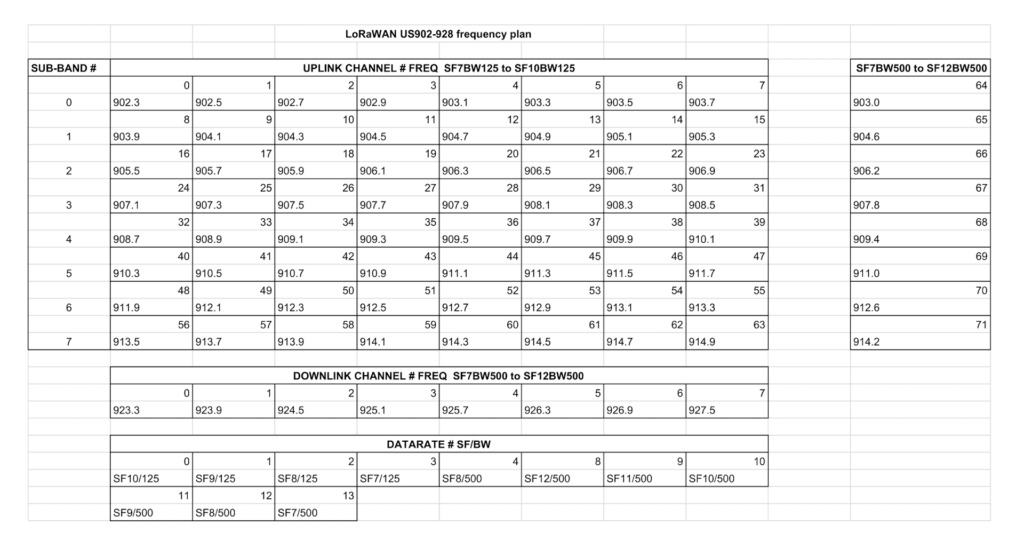
Understanding this table will be important to configure our gateway and nodes later.
The node must have configured the mask of channels and sub-bands through which it will transmit and receive.
Node Activation
To be part of a network the nodes need to be recognized, for this, this is achieved by saving the keys in the Node depending on the method, there are 2 types (OTAA) and (ABP), in our case we will only focus on OTAA.
Nodes require a method to enter, or be part of an existing network.
Over the Air Activation (OTAA)
The main advantage of OTAA is the security given that the session is done “on the Air” and is renewed every time the node disconnects, this difficulty can be cloned or stolen.
In the case of ABP, it is not very useful, nor is it practical since the credentials are fixed and if you change the network you must modify “manually”, for that reason we will not use it.
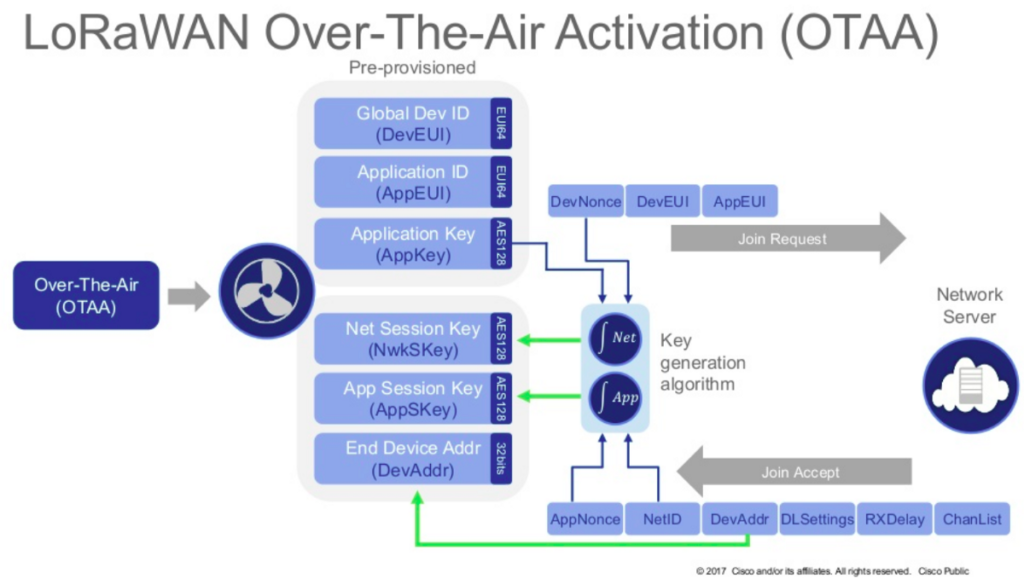
- Device identifier (DevEUI): it is a unique IEEE EUI64 identifier for each Node.
- Application key (AppKey): It is a unique AES-128 key for each device that will be used to obtain the NwkSKey and AppSKey session keys.
- Application Identifier (AppEUI): Unique application identifier used to group objects. This 64-bit address is used to classify devices by application. This setting can be adjusted.
Every node must have DevEUI and AppKey.
For the union (join) with the server, 2 MAC messages are exchanged: Union Request (Join Request) and Union Acceptance (Join Accept).
- The node performs a join request (or login) at any speed and then performs a frequency hopping sequence on the specified channels (uplink reception channels)
- The request goes through the Gateway to the server and will respond to the request to join with an acceptance message and will allow the node to join the network, otherwise there is none.
- After activation, the following information is stored in the node: a device address (DevAddr), an application identifier (AppEUI), a network session key (NwkSKey) and an application session key (AppSKey).
Chirp protocol
Chirp Spread Spectrum (CCS) modulation protocol uses fixed amplitude frequency modulation. You can use the entire assigned spectrum to transmit signals producing a signal that runs through the channel. There are two types of squeaks: the “rising squeak” that moves up in frequency and (not surprisingly) a “down squeak” that moves down in frequency, that is, when there is a squeak, it will move through the frequency assigned in any direction.
Spreading Factor – SF
The propagation factor or spreading factor is used to determine the speed of data transfer in relation to the range (distance), determines the number of bits used to encode a symbol, in lorawan they are used from SF7 to SF12.
SF7 is the shortest time to air and SF12 is the longest time to air, each step in the factor doubles the time to transmit it the same amount of data, that is to say greater SF, lower speed but greater immunity to interference.
Bandwidth – BW
It is the width of the Frequency, or it is also the space between each channel that we are going to use, for LoRaWAN there are 3 bandwidths:
- 125Khz
- 250Khz
- 500Khz
DataRate – DR
For LoRaWAN it uses different configurations of frequencies, propagation factors (SF) and bandwidths (BW) depending on where in the world it is located (Country / Region), for certain Bands and they have assigned speeds for sending data, in Uplink and Downlink.
For the bands US902-928 and AU915-928 the speeds are:
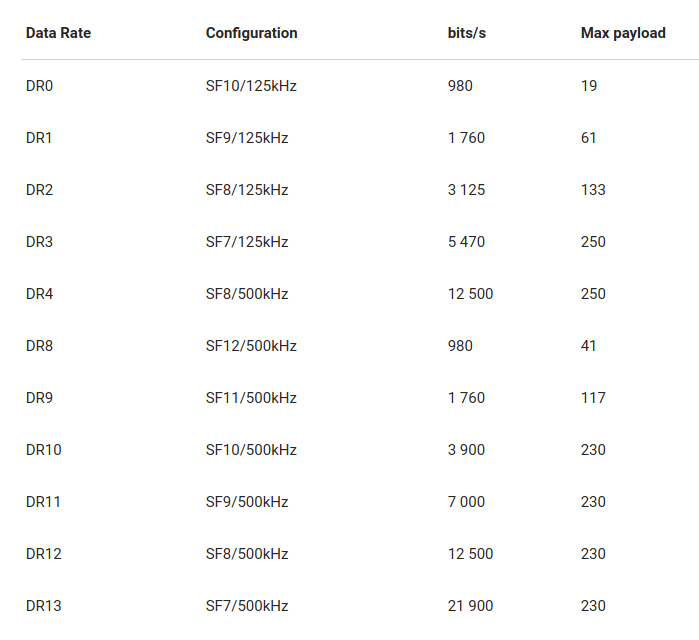
In my specific case America using US902-928, my gateway and nodes are using:
- Uplink : DR0 – SF10/125 = 19 Bytes
- Downlink : DR10 – SF10/500 = 230 Bytes
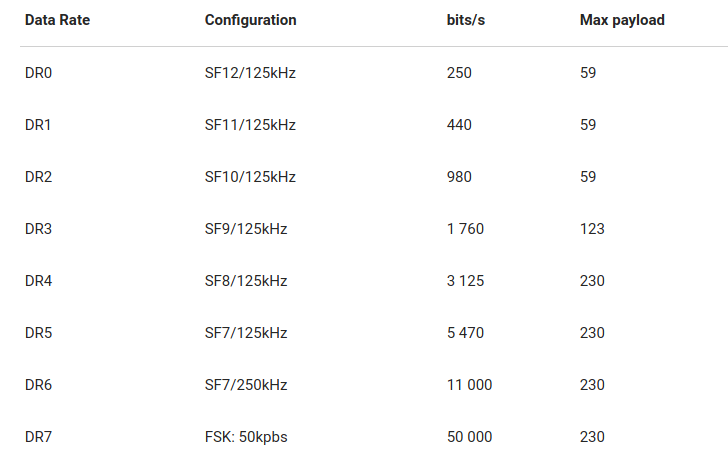
For the bands EU868, EU433, CN780 and AS923 the speeds are:
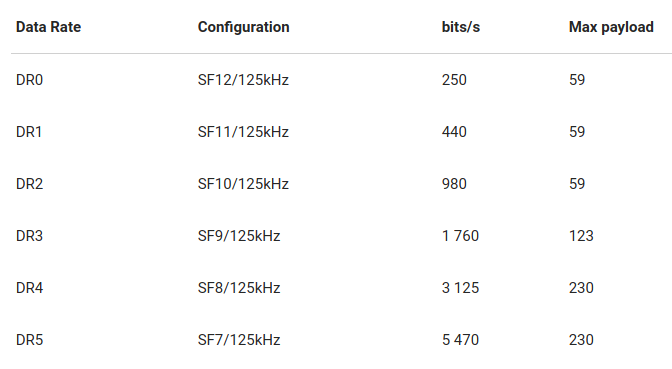
For the CN470-510 and KR920-923 bands the speeds are:

Payload
To transmit data packets in Uplink and Downlink (Array) of Bytes are used. The main idea of LoRaWAN is that the data packets are as small as possible and thus reduce the possibility of interference and the data arrive correctly.
You must optimize the sending of data, for that you must use bytes or groups of 8 bits, from -128 to 128 or 0 to 256 depending on the case.
Important: You should not send JSON or character strings (Strings or ASCII), encode your data in binary (bytes, word or hex).
LoRaWAN Frame Structure
We will not go into details, but the sending of data implementing LoRa is very basic, but the LoRaWAN data frames are more complex than there is the robust and secure, here an example of the MAC protocol.
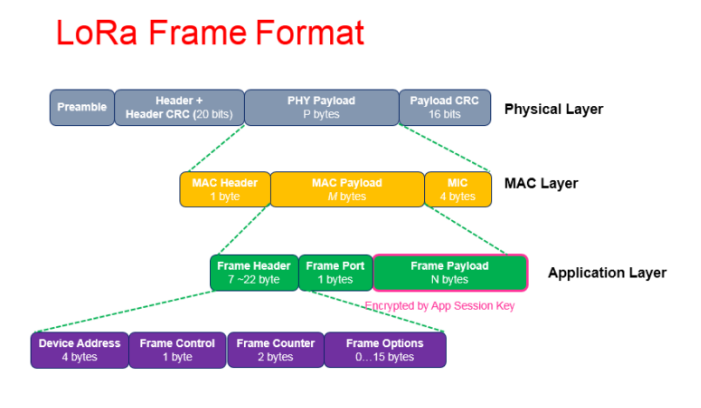
Recomended: working with Bytes (The Things Network).
The frequency of sending data already depends on several factors such as the work cycle, which we will discuss below.
Recommendations: a good practice, is to send example data (temperature sensor) only when the variable changes its value.
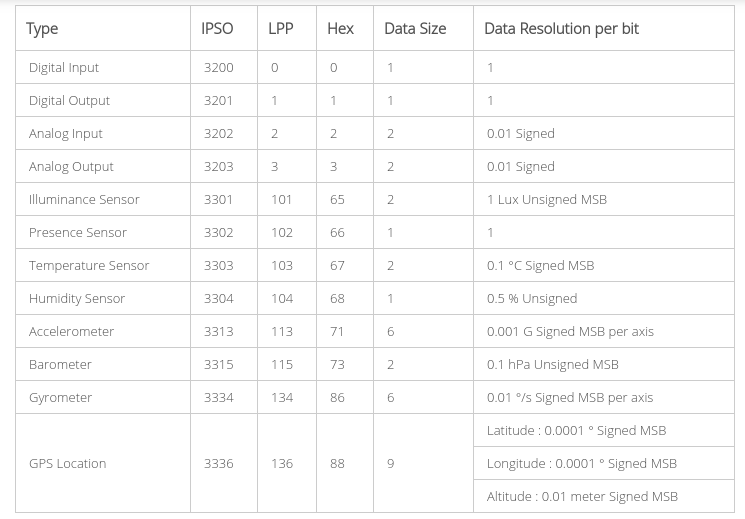
Cayenne LLP
The Cayenne IoT platform, has tried to normalize the methods of sending data called Cayenne LPP (low power payload), which meets the limits of sending data, reducing the payload to 11 bytes.
Recomended: Cayenne LPP (low power payload)
Recomendado: Este artículo en Español, Introducción, consideraciones y conceptos LoRaWAN
Code Rate – CR
It indicates the way of coding for the correction of errors, technically it adds control symbols to validate if the data received with correct or incorrect.
Types of messages: Confirmed and Not Confirmed
There are 2 types of confirmed and unconfirmed messages, technically it is that if a node sends a message (uplink) to the server, the server sends another message (downlink) to the node confirming that if the node was correctly received, in the other case, the node Send and receive no response.
Uplink and Downlink messages
Uplink, is the sending of data from the node (sensor / actuator) through the Gateway to the Server / Application.
According to the LoRaWAN US902-928 table, which contains the frequencies and sub-bands for Uplink, SF7 BW125 to SF10 BW125.
Downlink, is the sending of data from Server / Application through the Gateway to the node.
According to the LoRaWAN US902-928 table, which contains the frequencies and sub-bands for Downlink, SF7 BW500 to SF12 BW500.
Adaptive Data Rate – ADR
Adaptive Data Rate (ADR) is a method in which the server and gateway optimizes data speeds, airtime and power consumption, only works or works when the node meets the conditions the main being static, not valid for nodes that move.
Technically it is to detect if a transmission is very weak and to reconfigure whether you spend a lot of power communicating with someone nearby or you have very little power with someone far away.
Work cycle or Duty cycle
Depending on its implementation and region there are limitations of the work cycle, (it is a relationship between a dedicated time to send and not send).
For some frequencies the maximum duty cycle is 1%, that is, if you spend 1 second sending a message, you must wait 99 seconds before you can send another.
There are other cases in which the maximum duty cycle is 0.1% cases in which you have to wait 15 minutes.
The work cycle must be taken into account in the cases of The Things Network platform specifically in Europe at 868Mhz.
Recommended: Read Work cycle for LoRaWAN devices to better understand the work cycle.
Sen have implemented fair use policies, in The Things Network platform and must be respected, in my specific case I will use LoRaserver and set up my own server, but IMPORTANT, even if they set up a private server they must respect the work cycle, this depends on the regulations of each country.
RECOMMENDED, I have found this article that goes more into the work cycle for countries under 915Mhz, LoRaWan in the US915 zone, I also recommend reading it.
All this of the work cycle is important to determine how often they can send (Uplink) and receive data (Downlink), respecting the fair use of the ISM, since they are free, but they are for everyone, Do not abuse the frequency with the That sent and received data.
Security
LoRawan between nodes and devices is encrypted with AES-128, there are 2 encryption keys, a network session key and an application session key, both keys are unique to the devices and are used in messages and payloads, The information is encrypted from the node to the server.
Maximum distance
The maximum distance depends on many factors that affect or influence such as data rate (DR), dispersion factor (SF) and bandwidth (BW) that although related are not directly linked, that at the configuration level, at the physical level It depends on the density and nodes and gateway antennas, there are estimates with the already known IC modules SX1272, SX1276 y SX1278 and RFM95, 20km are estimated, but I consider it relative, my answer is to make your own tests.
Number of Nodes
The answer depends on several factors directly from the gateway and types of nodes configurations, region (bands, channels, etc.), in my case I have a RAK833, estimate approximately 500 nodes!!, at approximately 2km, a large amount, impossible with Wifi or other technology.
LoRaWAN limitations
LoRaWAN is a great implementation but it is not the perfect solution to your IoT applications, LoRaWAN is not for real-time data, nor did it send TCP / IP and video or audio or telephony, The Things Network, has defined a detailed list of the scope and LoRaWAN limitations.
Recomendado: Este artículo en Español, Introducción, consideraciones y conceptos LoRaWAN
Recommendations
Initially so as not to fail in the attempt and do things well, I recommend the following, of course I am not an expert in the field.
- Before buying equipment and doing things, first read and document about LoRaWAN, in LoRa Alliance the main promoter.
- Investigate and respect the regulations and regulations on radio frequency and ISM bands in their corresponding country.
- The purchase of equipment, the specific case of the gateway, must be multichannel, the single-channel gateway does not work! in real implementations.
- Responsibility with the use of the work cycle of their devices.
Recomendado: Este artículo en Español, Introducción, consideraciones y conceptos LoRaWAN
Conclusions
LoRaWAN is an excellent implementation, from my point of view in simple, economical, functional and above all safe but it is not suitable for all cases and applications.
LoRaWAN can be complex if you want to implement code from Zero, many have made implementations in LoRa, but LoRaWAN is much more robust, standardized and will not be implemented overnight if the basic concepts are not understood, so they should not be make configurations or adjustments without taking into account the factors we list in this article (bandwidth, data rate, coding rate, etc.).
Important when choosing your equipment, and start testing my golden rule:
- Very cheap or affordable devices, in many cases require code implementations or a lot of development time. We will not use Arduino or Arduino IDE with LoRaWAN tests, we will use ESP32 with ESP-IDF and RFM95 modules.
- Relatively more expensive devices require less or technically no special implementation or development, in the case of RAK811 modules (nodes), they are more expensive than RFM95, but they do not require additional code and are technically to unpack and connect.
Finally, I am not an expert on the subject, I hope that in the comments they will indicate if any concept is wrong and correct it, I await your suggestions, again thank you very much for this here at PDAControl, greetings.
Recommended
Recommended articles and sources with lots of information.